Archive for the ‘boatbuilding’ Category

Boat Rolling Jig

June 15, 2021

Our Penny Fee sailing tender needs to be turned over from time to time so that we can do a more thorough job of sanding and painting her bottom and boot top. Moving an 800-pound boat off the trailer and turning it over without getting hurt or damaging the boat has always been a daunting process. It is possible to invite ten strong friends over and do it that way but even that takes more organization than I would like.

I have been thinking about this for some time and when I was given three pieces of used 5/8” plywood, I thought it was time to come up with a better, safer way to take care of this evolution.

What I came up with is based loosely on a method that I have seen illustrated in several boat-building journals. The idea is to unload the boat from the trailer into the bottom half of a jig that cradles the boat, then place the top half of the jig over the gunwales of the boat and attach the top half of the jig to the bottom half.

If you look at the illustration you see that one half of the completed jig forms half of a large circle with the boat positioned in the middle of the jig.

This allows one person to roll boat and jig over easily as the video shows.

Once the boat has been turned over, remove the bottom half of the jig (which is now on the top of the overturned boat) to work on the bottom of the boat.

When you have completed your yearly chores, reassemble the jig and roll it back over.

In order to make this a one-person job, I also constructed a simple jig to support the stern of the boat and lift it slightly so that the boat is supported and stable while the trailer is slowly rolled most of the way out from under the boat. By lifting the boat a few inches, this jig also makes it easier to slide the parts of the jig under the boat to set them up. The stern jig can then be used to lower the boat down into the cradle of the main rollover jig. The stern support is raised and lowered simply by tapping two large wedges either in to raise it or out to lower it.

All the parts of the jig that touch the boat are covered with carpet to protect the finish on the boat.

The jigs took about five hours to build. Set up time is about twenty minutes and break down time is about ten minutes.

I spent money on three ten-foot 2x6s, two eight-foot 2x4s, three eight-foot 2x6s, and a box of screws. It was worth it.

YouTube Channels: a few observations…

April 5, 2021

Both the woman who will willingly get up in the middle of the night and stand anchor watch, and I try to keep up with our connections in the maritime world.  We subscribe to at least six maritime oriented magazines, talk with and socialize with a fairly wide circle of other sailors, and even read something called newspapers. I should say that I spend almost no time on social media and rely on the woman who will willingly get up in the middle of the night and stand anchor watch to let me know if something interesting in the marine world pops up on facebook. It has only been in the last few years that I have become at least peripherally aware of YouTube channels on sailing and boating. I have not spent a great deal of time looking at these channels, nor, based on what I have seen, do I intend to in the future. Now, before anyone takes offense, just realize that I would rather be doing than watching anyway; so vicarious sailing is not really my thing.

I am not hear to bash anybody and your tastes may be very different than my own when it comes to YouTube videos, so let me just say that a number of channels are either about sailing in the tropics: been there, don’t like the heat and humidity, or crossing oceans, and my personal feeling is that leaving is great and arriving is great, the middle, not so much. So that rules out a lot of channels for me. Secondly, a number of channels that are truly about sailing tend to be almost exclusively about sailing modern cruising boats, which means they spend a significant amount of time explaining how they maintain the multiple systems on the boat, or how they can’t get parts for the systems on their boat, which doesn’t particularly interest me either. There also seem to be a number of channels that are more about the relationships between members of the crew as they sail to wherever, which frankly turns my stomach. However, if any of that stuff sounds fun to you it looks like there is a lot to watch, and that’s fine too. Just because it is not my thing does not mean it isn’t interesting, it’s just not interesting to me.

Now that I have gotten that out of the way, there are four channels that have caught my interest. I think each is unique and each has something to offer. Two are truly sailing related and then two are strictly speaking about boat building (in wood).

First on my list is Dylan Winter’s Keep Turning Left. Dylan’s goal was to inexpensively circumnavigate the British Isles. I have not watched all of his work, or even the majority of it, nor do I realistically think I am going to get around to binge watching his episodes (or anything else for that matter, I have wooden boats remember) but I will say his posts are extremely well made, and quite captivating.  He has been at this since 2008 and before that he worked professionally in video so the quality is outstanding. His most recent videos are just short sailing shots, but his longer episodes are worth watching. Full of current impressions, observations of nature, and historical narrative, Dylan is an incredibly well spoken narrator, capable of exploiting the richness of the English language, not above expressing a personal opinion, and brings a knowledge of craft to his posts that put his work firmly in the realm of professional film worth watching, head and shoulders above everything else I have seen. So that’s my recommendation for you armchair sailors, check out Keep Turning Left.

Next on the list is Tom Cunliffe. If you don’t know who Tom is, you are probably not familiar with the gaff rig. Tom has sailed the world’s oceans, mostly on traditional rigs, writes for Classic Boat magazine, has written a number of books, and is both knowledgeable and witty. It is true that many of his videos are short and he just speaks to the camera from an interesting location, but his use of language and his definitive statements are both educational and entertaining. I am biased since most of what Tom espouses are opinions that I share, that said, there are very few sailors who have had the experiences that Tom has lived through and he is worth listening to for that reason alone.

Third on my list is Acorn to Arabella. This is two guys, Alex and Steve, who have taken on the task of building a wooden boat starting with cutting down the trees and going from there. They are not professional boat builders, are learning as they go, and are trying to document their learning curve mistakes and all. What started as documentation of building a boat has taken on a bit of a cult following. They are now pretty well supported on Patreon and have some support from Jamestown Distributors as well. I have certainly not watched all their videos since some of it is pretty basic stuff filmed in detail, but parts are quite engaging and the editing of their videos is quite good.

The last, but arguably best on my list is Sampson Boat Co.

Sailor and professionally trained boat builder, Leo Gooden has taken on the restoration, really the complete rebuild, of a century old famous Albert Strange sailing yacht, Tally Ho.  He started financing the project himself and now he too is supported through Patreon and donations. He has a huge following, partly because the skill set and craftsmanship filmed is outstanding and a bit mesmerizing to watch, but I think principally because his ability as a boat builder is matched by his ability as a filmmaker. The videos are beautifully shot, well narrated, and most significantly, extremely well edited. They are both entertaining and enlightening, most of all, the vessel is magnificent and the work being done, superb.

In my humble opinion I think his videos are more watchable than anything on television.

The refrigerator light

August 23, 2020

In writing about the high tech solution to our icebox on the Friendship sloop, I don’t want to forget the lighting for the icebox. The hatch at the top of the box is partly under the bridge deck making it one of the darkest work places in the galley, it is particularly frustrating when one is looking down into the icebox, which just looks like a black hole. To have to grab a headlamp in the middle of the day to fish something out of the icebox just seemed ridiculous.

Just as the solution to cooling the icebox was extremely high tech the solution to lighting the box was wonderfully low tech; a bulls-eye deck prism.

Bright sun, cloudy, even fog, it really does not matter, the prism lets in a great deal of light especially right into the icebox when it has been opened. The only time the prism is not working is in the dead of night, and even then, if the lamps are lit below the glow from the prism on deck is really cool.

Best of all, there are no moving parts.

Quarantine and the icebox on the boat

August 16, 2020

We usually take two weeks to go down east each summer, and usually schedule a number of events to attend with one or the other boat, or both. Of course most of the events this year were cancelled and added to that one of the cats who owns the cottage where we live is twenty-two and needs more support than usual. So this summer the two-week trip was really not an option.

Now the part I really don’t like is that with the two of us still working full time (the human two, the feline two are retired) we have to make our cruising plans starting in March. Of course in March of this year it was not clear whether we would be able to go ashore at all once we got to our boat. So we began to consider the possibility of cruising without going ashore. Our Friendship has adequate water and fuel tanks to last a week even in less than ideal conditions, but the one stumbling block was the icebox. In a typical summer cruise we need to go ashore for ice about every three or four days. Back in March that looked like it might not be an option.

While we considered going without and bringing only foods that did not need to be kept cool, the more we thought about that the less attractive it seemed. After a really hot day sailing in the sun nothing tastes as good as a cold drink. So what were our options? As we continued to explore this topic we realized that quite honestly even without the complications of a pandemic, getting ice for the icebox is one of our least favorite chores. There are a number of reasons for this; not least among them is that ice, which used to be available on just about every dock and lobster pound, is getting harder to find. Spending half a day rowing ashore and walking along a back road for a couple of miles in order to buy a block of ice, put it in a bag and backpack, do the reverse walk back to the tender just to keep food from going bad is one of the least pleasant tasks on a cruise.

After a great deal of thought and research we made the decision to do something that I never wanted to do: convert the icebox.

The reason that I did not ever want to do this is pretty well spelled out in other parts of my writing on this blog. We go to our Friendship sloop to escape the complexities of a twenty-first century life; we love the simplicity of a wooden boat with very few systems to maintain. I will admit that anchoring in a quiet cove and then finding that there is no cell service gives me secret joy.

However, converting the icebox to a refrigeration unit meant adding a system and a complicated one at that, so you can see my dilemma.

Our ice box is custom made and is extremely well insulated, two inches of closed cell foam on the top surface, three inches in the side walls and four inches in the bottom. What that means though is that the interior of the icebox is not very large so we needed to find something that would not take up more space in the icebox than a block of ice and that would not eat the life out of our house batteries. We have two house batteries each with a rating of 89 amp hours. Lastly I was looking for something that would not be a massive headache to install.

After much research we decided that what would best meet our needs was a cold-plate system made by Isotherm.

The most intimidating aspect of the Isotherm Plus cold plate system is that basically it is smarter than I am. When operating it knows when there is charge going into the batteries and there is excess power so it accelerates the compressor and super cools the cold plate with the excess electrical input. It also knows when there is not power going into the system and it then goes into a conservation mode, further you can set it so that should battery level drop to a certain point, it stops drawing power all together. It sounded too good to be true and made me suspicious, especially since I didn’t understand the half of it. Still, if it worked it would be a significant improvement to keeping food cold and not having to track down ice.

I built in a small cupboard under the sink in the galley for the compressor unit and made sure it had a duct for cold air from the bilge and a duct to exhaust heat out into the lazarette. The problem started with the exact placement of the electronic sensor in the icebox. The manual that came with the unit and the information that I found online contradicted one another. Fortunately, I found Isotherm-parts.com in Fairhaven, MA through the Internet and gave them a call; they gave me the correct information (not, by the way what either of the other sources had said) and were very helpful. With the placement of the sensor settled, I connected up everything electrically and by gum it all worked.


Cold plate in Icebox with freezer section

We have lived with the system for a couple of months now, including the eight-day cruise that I started to write about in the first paragraph, and have been very pleased. Not only does it work as advertised, but on the advice of the person I talked to at isotherm-parts.com we have an “overflow system” this means there is a part of the icebox that is freezer, we can actually make our own ice.

Let’s just take a little diversion into making ice:

When I found out it had that capability I also realized that we might not be able to take advantage of it, you see the shape of the freezer section is more vertical than horizontal. Now that is not unusual in a marine refrigeration unit and they do make vertical ice cube trays, but they are still kind of big for our icebox and at $70.00 for the cheapest one I could find, I was not going for it. Then we put on our thinking caps and came up with a better solution, they make stainless steel condiment cups with Tupperware lids, $7.47 for six of them. We fill each ¾ full of water, snap on the lid and each one produces an extra large ice cube. Perfect.

individual ice cubes

One large cube works for an individual drink

We even discovered that by taking a leftover piece of dust collection hose we could stack the individual cubes in vertical dispenser.

Cubes stacked in a homemade dispenser

The cruise was a resounding success and we never had to go ashore or to a dock for supplies, more on that in a later post, and we have ice in our drinks, how cool is that.

Nice!


New Work on the Friendship Sloop

August 8, 2018

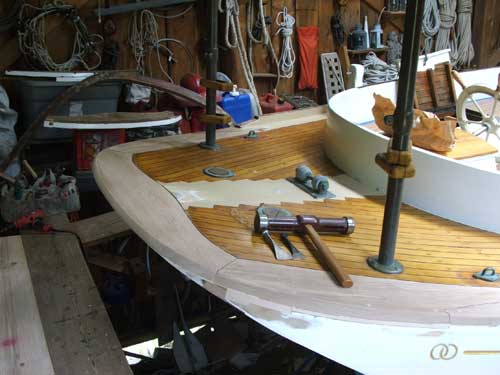
This spring presented some real creative challenges for us, mostly related to our Friendship sloop.

Last fall as we got ready to decommission the boat for the season we found ourselves trying to make a rather tough decision; do we pull the engine and have it reconditioned, or do we replace the it?

On the one hand, our 28-year-old engine always starts. In all the years that we have been living with this boat, it has never failed us. On the other hand, it was developing some problems and the time to intervene was now.

I found that I was going back and forth on what to do. I don’t like working on the diesel, it is about the only thing about working on the boat that I don’t take much satisfaction in, my strengths do not include being a diesel mechanic, so rebuilding, or reconditioning this engine would mean pulling the engine to have a professional do the work. So why is that such a stumbling block? In the first place expense. The cost to have the engine professionally reconditioned is almost half the cost of a new engine. In the second place, where would that get us? We would, in a best-case scenario have an engine that is in better shape, but is still 28-years-old and which has always been underpowered for a boat that displaces almost eleven tons. That second part is key, if you are just going to use the engine to get off the mooring or through a crowded harbor, or when the wind dies, then this is no big deal, but we love to cruise, and have been in many situations where unexpected weather conditions meant that we needed a reliable engine powerful enough to help us get out of harms way. Several close calls in the last few seasons made us realize that our old engine was operating at the very extreme edge of its capabilities. Between us, the woman who will willingly get up in the middle of the night and stand an anchor watch, and I, have more than eighty years sailing experience. You don’t acquire that kind of experience without becoming acutely sensitive to where the edge is, and when you are too close to it, and we were too close to it.

So that would seem to point us in the direction of replacing the engine, except that as I said above, I don’t like working on diesels, and at least I know our old motor, I know what is likely to go wrong and how to fix it. I have spare parts on board and the appropriate tools on board, and there is a lot of comfort in that. A new engine would mean getting to know a new power plant and perhaps having to reconfigure systems around the new engine, what would that involve?

While the choice seemed obvious, the unknown factors were making me very uncomfortable.

Last fall I started to research the answers to as many of those questions as I could. I talked with representatives of just about every manufacturer of marine diesels; I got specs on multiple engines, talked to mechanics, and spent a lot of time in the engine room of the boat measuring. Mostly I asked a lot of questions and listened to the answers.

By midwinter only three things were really clear, one was that we could indeed purchase a new diesel that was physically about the same size as the old, but that had greater horsepower. Second was that if we were going to get the most out of a new motor then a new propeller, matched to the size of the engine, the size and shape of the boat and which would, in turn determine which reduction ratio for the transmission would be needed as well. And third, that I really could not determine how many other things, like the exhaust system, or engine beds, would have to be upgraded until we made the commitment to one particular make of engine.

We began to narrow the field.

As we asked more and more specific questions the answers we got kept bringing us back to Beta Marine. While the package that they suggested was not the least expensive that we looked at, it was the most complete and would require the least number of modifications to the boat as a whole. We would need to replace the waterlock muffler, build and mount a new containment box for the engine start up panel and gauges, and it was clear we would have to move the electrical panel. None of these were, by themselves, that big a job, however, if we were going to go ahead with this then it made no sense to keep the old engine control levers which were completely worn out. With a new engine and new controls it did not make a lot of sense to keep the old control cables, so they would be replaced too. And since we were pulling the old prop and the old coupling, then removing the propeller shaft to change the cutlass bearing also made sense.

di2fc94eeof386b4fonej5s3z4q5fvbo

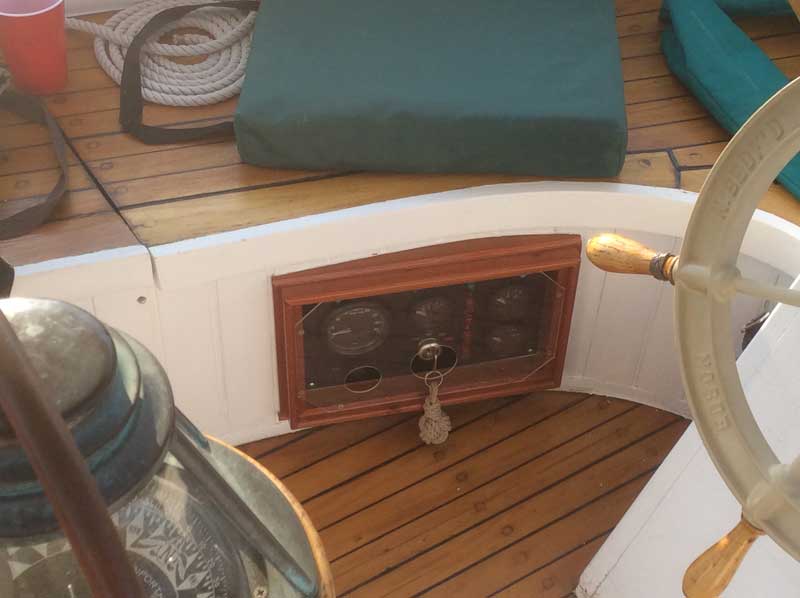
The old engine panel

sdj1hdrl4wy7te928zb734l0czt3thc2

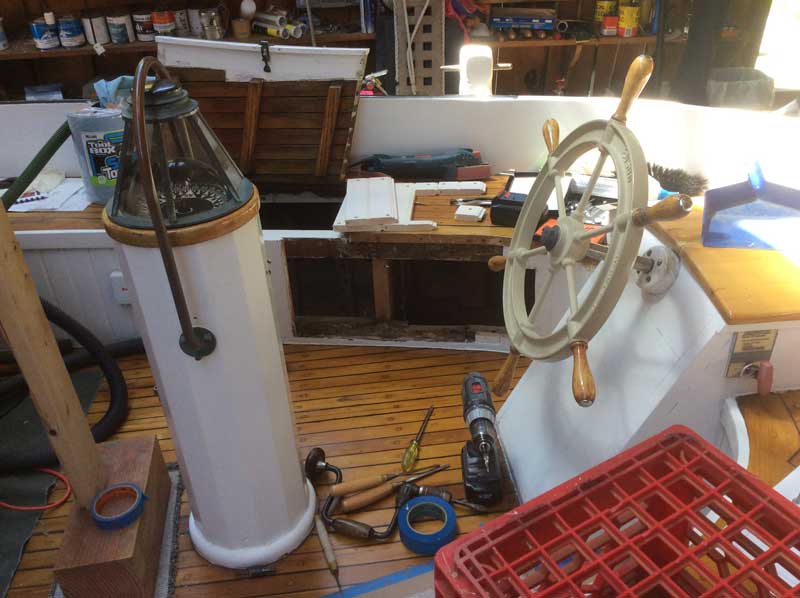
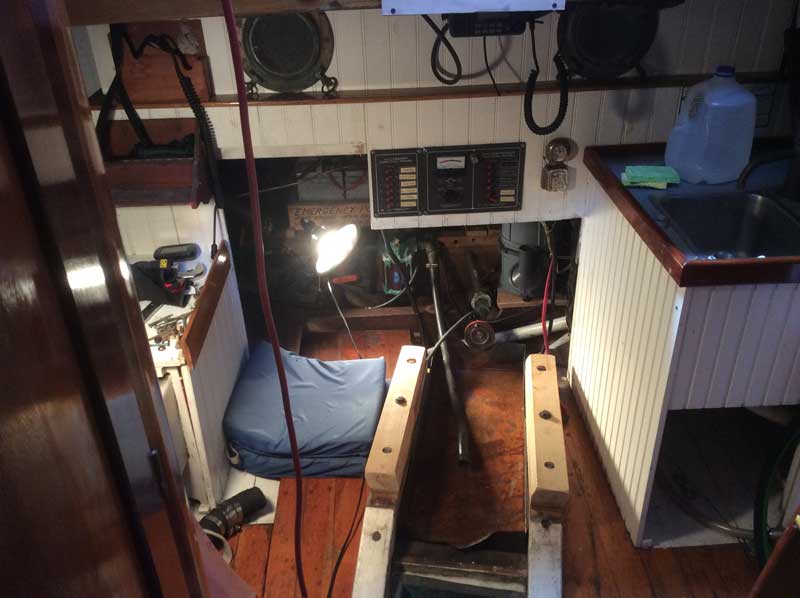
Opening up the cockpit to install the new engine panel box and remove a few soft planks at the same time.


5zhozcsgect4mf5vq4ynyj4ftn8xl5r9

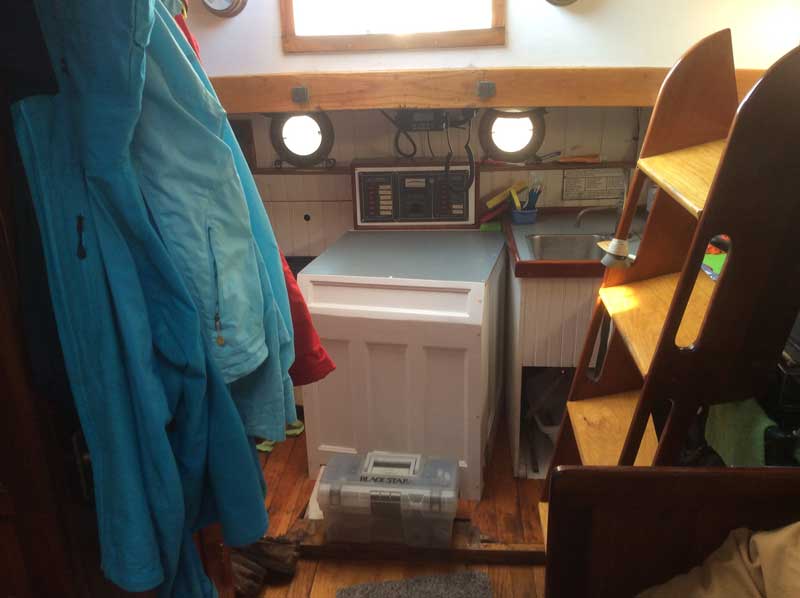
New engine box for the new panel.

As is often the case with a project like this, several jobs that I thought were going to be major hassles proved fairly easy; the engine beds for example. I worried about this a lot, but in the end it turned out that modifications were simple and quickly accomplished. The alignment was another thing I was worried about that went easily and with far less complication than I have run into in the past. On the other hand a lot of seemingly little jobs that looked easy turned into major epics. I ended up having to machine connectors for the new control levers and in the process of moving the electrical panel; it became clear that a number of connectors and wires needed replacing. All of this stuff takes time, especially when you realize to move forward you have to stop what you are working on, figure out where you are going to get a part, or parts, then wait for it to arrive. Once back to work, that is when I would discover that there were other parts I should have ordered too.

I won’t go into those epics save to say that it is the details that will kill you.

khvx6tk87dm4aj5jzz73r3826xzb8q28

Engine beds modified to fit the new engine.

nl4lyxv2e9rngm6zt6ex0nzpcvl68p6x

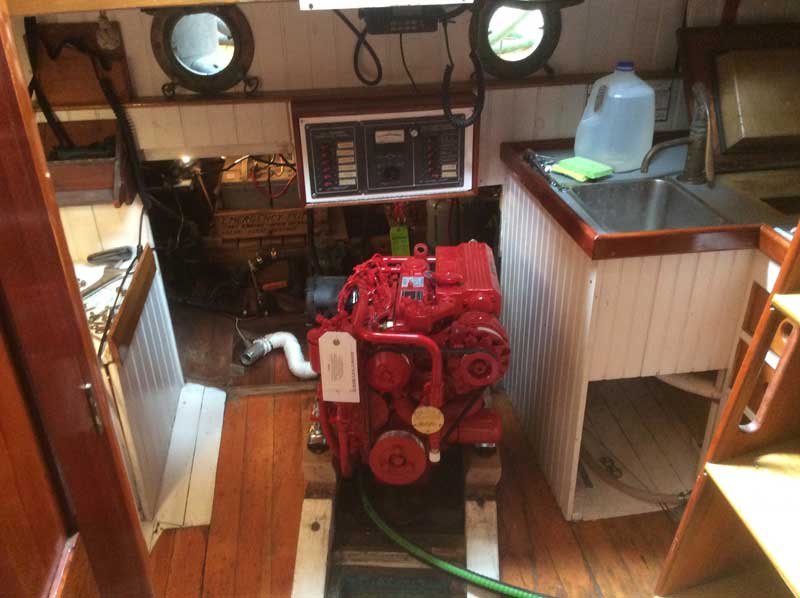
New Beta Marine 38 in place.

We have been using the engine now for almost two months and so far, touch wood, it has worked flawlessly. It is slightly larger physically than the old Westerbeke, which required a new engine cover, which also required some creative re-working of our companionway steps. However, I was able to make the box that covers the engine out of lighter materials and that makes it less of a chore to get to the engine.

a7ysr90tf02ond4g24hc7uxivwxzsjqm

New engine box (minus trim). Note the electrical panel has been moved up and into a box for easy access.

f8wy21hkrlid4z7pxmtx10dkh7gsfgnf

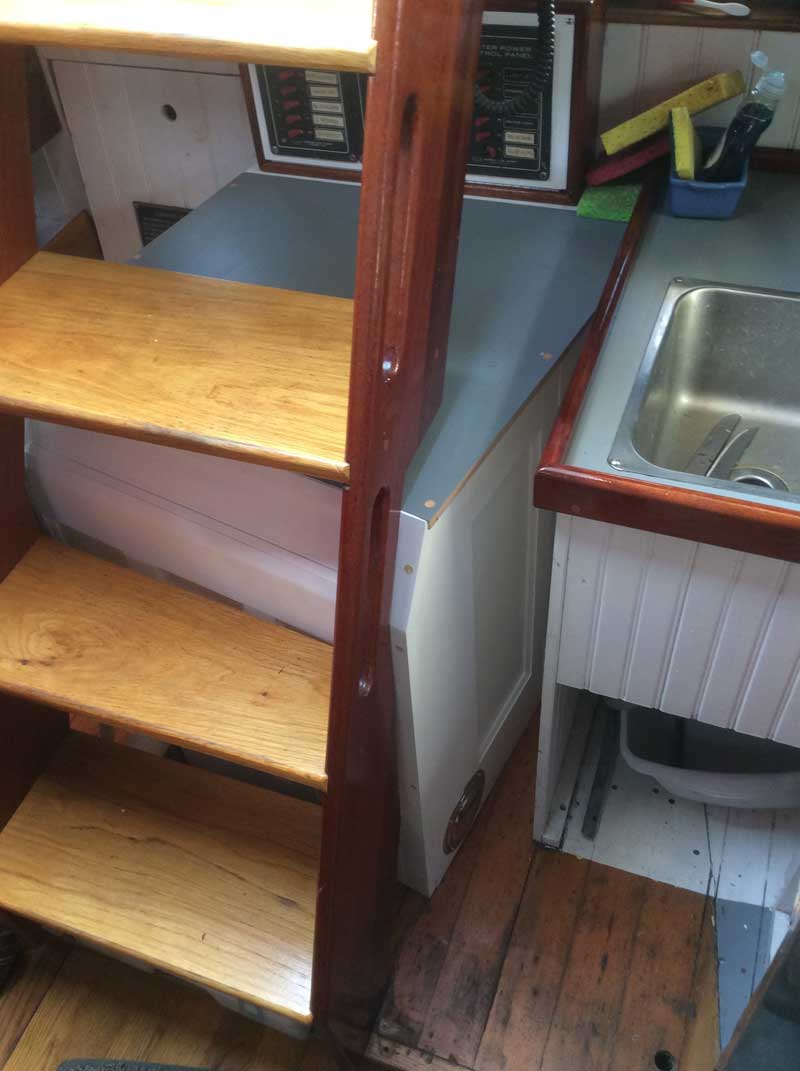
You can see here the modification we needed to make to the companionway ladder to fit the new engine box. The new engine is slightly longer than the old, and I wanted plenty of ventilation around the motor. You can also get a little closer view of the box for the electrical panel and the piano hinge along the bottom edge.

Also, when we moved the electrical panel we created a box for the panel with a hinged front. In the past if there was a bad connection in the panel, or a wire needed replacing, I had to crawl into the engine room and work directly over the engine where there was little space and it was hard to get at the back side of the panel. The new arrangement allows me to loosen two screws and the front of the panel folds down into the main cabin where there is light and easy access.

The whole project consumed more than five weeks of spare time, but we feel more comfortable on the water when conditions deteriorate (and they have already several time this season). Working with Stan at Beta Marine U.S. was easy and they were very helpful when we had questions. Later in the summer we will work on finding a new home for the old Westerbeke, but for now we are enjoying the improvements to our systems and to the engine operation.


Marine Paint Part 3

March 7, 2017

The lead is gone….

It is March, and that means that the process of preparing for the next boating season has already begun. It is in February and March that I start ordering materials and looking at the work that needs to be done before the boat(s) go back into the water. I have written about this before, but I wanted to write an update on this subject of yearly maintenance because I got a nice comment from one of the Kirby’s regarding their paint.

I wrote in Marine paint part 1 about why I like Kirby paint, (you can read more here) but I commented that it contains lead. It turns out that Kirby paint has not contained lead for over twenty years. They still put warnings on the cans because sanding old paint that might have lead in it can still present a health hazard.

It is great to know that there is one less toxic hazard to face when preparing for another season.

One of the things that I like about wooden boats is that when they are looked after and well maintained, they can last and incredibly long time. We have several friends who own Friendship sloops that are over one hundred years old, those boats are still sailing and are still in good shape.

The key phrase there is “looked after and well maintained”, maintenance that is messy, 8px910qlhbe7m81y94ijvlkj93ohojkeinvolves dangerous chemicals, or results in cleanup of toxic ingredients are typically the first things to get dropped from a maintenance schedule because they are too much of a pain. And few things are more discouraging than doing all the hard work of sanding, fairing, cleaning and tacking and then applying paint, only to have that paint not hold up to the environment, fade, or peel.

A wooden boat is a living thing, and like all living things they require regular care and when a problem develops that might affect the health of the boat, it needs to be dealt with or the boat will start down the road to the burn pile. But it is getting harder to find good quality wood and good reliable products to care for a wooden boat. Good paint that gives consistent results and that does not change its formula or color chart can be even harder to find, but good quality paint is also critical, it provides an absolutely vital barrier to the elements and contributes to the longevity of a wooden boat.

As I have said before on this blog, I like Kirby’s paint, we have used it on our boat now for sixteen seasons and are pleased with the results, and now that we know that it does not contain lead, we like it even more.


A long overdue update:

September 6, 2016

The last post was about children’s gifts for Christmas 2014, since then a lot has been going on.

2015

First the fleet; we built a new sail for the launch and finished a new solid mast for the Penny Fee the winter of 2015. Both worked out well until we cracked the new mast at the partners (on one of the last weekends of the season). It would appear that a flaw in the wood and the smallness of the opening in the deck combined in the worst possible way. So this spring we built a new mast (our third) and redesigned both the foredeck and mast step. So far the results have been good.

Our Friendship sloop also got some attention in the spring of 2015. In addition to the usual painting and maintenance, we had discovered rot in the covering boards over the transom. This is an area known to have problems in any boat with an elliptical transom so we were not overly surprised. The actual rot was not very extensive and limited to the covering boards themselves where the end grain was most exposed to the elements. The new white oak for the replacement covering boards was not too costly, but the work dictated the removal of the toe-rails aft and the bulwarks which was both time consuming and a little painful since both jobs involved removing sound wood that looked great and would only have to be put back together later. This is the kind of job that I am not fond of since when you are done, if you have done a proper job, no one will know that you have done anything at all…well our surveyor knows since he got a look at the finished job, and I guess that’s a good thing.

bohselxk95ryd3mr6qtbmx8uomegivgu

New covering boards

Anyway the fleet went into the water in mid June.

While we were working on the fleet we were also setting in motion a building campaign that has been in the planning stages for five years.

The cottage where the woman who will willingly get up in the middle of the night and take the anchor watch and I live and that is owned by the two tortoiseshell cats has been in sore need of attention for some time. Difficult to heat, limited in space, poorly insulated, and with dodgy plumbing, it is nonetheless a beautiful old classic cottage dating from the late 18th century. In fact it is one of the oldest houses in the area. We have been working on a design that would allow us to add some space, replace plumbing, and some wiring, as well as better insulate and add both a soapstone heater, and new wood stove.

We started this project in the spring of 2015 knowing that the summer would be too busy to commit much time to the project (we were right about that) but, being in the mountains of New Hampshire, there is never a good way to know what will happen when you start digging for a new foundation, even a small one. If we hit solid granite we knew we would need time to reconsider the design, thus we broke ground a full three months before we actually intended to start construction.

Fortunately, we did not hit ledge and things went so smoothly (despite busted water main) that we were able to get the foundation and the new septic line in and finished before the summer really got going.

4985yyeixjytq0p86azot5qbrcf8v5wa

Foundation in and covered for summer

With the new foundation in the ground and covered with a tarp, the boats splashed and we made ready for a cruise to Mount Desert Island and back with friends.
Two weeks in July that were a total time out. We cruised with three other Friendships and a retired commodore who had owned two Friendships himself but has now progressed to a handsome lobster yacht, much easier to manage for an older solo mariner.

Pretty much everywhere we went we met with warm welcomes and safe moorings or dockage.

ey9pxe7vjn2cjj46zak1sct78ol46fag

In September the building project got underway in earnest and has dominated our lives since then. The actual addition went up quite quickly, but since we were doing almost all the work ourselves, it was also exhausting. We were under cover and closed in from the weather by the beginning of November, and then shifted to working on interior spaces.

jxc7v9dkwqsa4l9s739nil6kfwgknpuv

We spent most of the winter learning to use the new soapstone Tulikivi heater. Thankfully we had some expert help with that.

qz58tpudyi717070bgfedghbhr7clind

2016

As we entered 2016 we were still working on interior construction of the addition, as well as replacing some worn out furniture. A new dining table of white oak, some built in benches, and at least the start of more cabinets to augment the minimal kitchen storage that we have.

The boat projects this spring included the replacing of a bulkhead that had been getting soft in the cockpit, and the mounting of a bronze windlass that should make retrieving the anchor easier. There was also the yearly painting, varnishing, and bottom paint.

We put the fleet in the water about a week earlier than usual, and between keeping the fleet up to scratch and working on the cottage it has left time for little else….

New steering for the launch

August 5, 2014

We have been pretty happy with our Iain Oughtred designed launch, but now that we have sailed her for a couple of seasons we are trying to refine the few things we don’t like, or did not get right on the first go-round. One of those things was the tiller.

Initially I opted for a very traditional tiller. I liked the simplicity of the design and the classic look. However, what we found is that the traditional tiller had some traditional limitations due to how we use the boat. One has to do with sailing; if you are sailing the boat you need to push the tiller very far to port or starboard when tacking. This requires that the helmsman move his or her body all over the place just to tack the boat. This becomes even more problematic if you are single-handing because the excessive movement aft lifts the bow out of the water making the boat less able to windward.

The other issue has to do with taking passengers. The boat will comfortably hold five adults, except that anyone sitting aft has to deal with the sweep of the tiller and the dance of the helmsman.

None of this is totally unexpected, but it has become more annoying than we were prepared for.

What we ended up doing was to go back to the design source. 

Iain Oughtred has another design, the Caledonia Yawl, similar in size to the Penny Fee, with a push-pull tiller arrangement that frankly did not look that great to me on paper. However, I ran into a video of the tiller set up on Off Center Harbor and was totally swayed. I conceded (at least to my self) that it would not look as elegant and simple as the original tiller we had, but to my surprise, I found that the new design, while less classic, has a simple functionality that is also quite elegant.

Another advantage to the new system is that we made the tiller longer than the original so that if you are taking the boat out for a sail by yourself you can sit more forward, almost in the center of the boat which makes the boat balance beter.

It takes some getting used to and the instinct from long time sailors is still to move the tiller from side to side instead of fore and aft, but after taking it for a spin under sail and oar, I find that it is a really neat solution to our previous problems.

We had to come up with a way to lash the tiller when we leave the boat at the float, and that has not been a perfect solution, but we are working on it and that is a small wrinkle to work on.

Now I need to get back to work on the new sail. I am convinced that moving the center of effort aft, even a foot will create less drag in the rudder tacking and may gain us a few more degrees closer to the wind. We shall see.

Where have I been?

July 24, 2014

My loyal readers (both of you) may have been wondering what happened to this blog, since I have not posted much in the last year. The truth is I have been writing a lot, but just not on this site.

A lot of my time during the last two years (perhaps too much of my time) has been devoted to bringing out a new book.

Lasting Friendships, a Century of Friendship Sloops has been in the pipeline since November of 2012. It has been produced and Published by the Friendship Sloop Society, and I have been spearheading the project.

Part of the reason that I agreed to head the group that was putting this book together (aside from a love of Friendship sloops and their history) was an opportunity to work with Ralph W. Stanley.

Ralph has been recognized as a master boatbuilder and is an NEA National Heritage Fellow, but he is also an excellent writer and historian. Without his help the book project would have been much less interesting the finished book much less impressive.

The book also allowed me to meet and briefly work with Maynard Bray, who wrote the introduction for the book. Maynard has a long history with WoodenBoat Magazine and with Mystic Seaport. He is also one of the key figures between Off Center Harbor, a video website and collection of blog posts from some of the more influential sailors, writers, and boatbuilders from this part of the world.

When I took on this project, I did not realize how confused some of our own records at the Friendship Sloop Society were, nor did I fully appreciate how entwined the history of these sloops is with the local history of small towns up and down the Maine coast. We had terrific and generous help from Ben Fuller and Kevin Johnson at the Penobscot Marine Museum. Frankly, without their help I am not sure we would have ever untangled the origins of certain photographs. But we also had help from librarians, town historians, and many members of the Friendship Sloop Society. Without their help this book would not have been possible.

I am very relieved to have this project off my desk and am looking forward to getting some of my life back, and I might even have some time to devote to this blog too.

The book is available in soft cover from Amazon, and in hardcover exclusively from the Friendship Sloop Society.


Boat Shed Details

January 3, 2014

A reader requested more specific details for the boat shed that we built in 2000. I have three thumbnails below of the original building plans with materials lists and details on them. If you click on each one you should be brought to a larger image. You can either print those, or blow them up on the screen to read the details.
Happy New Year!