Celtic Wheelhouse
Welcome to the Wheelhouse page. On this page, I have put together older posts that relate to the Celtic Wheelhouse that I built in 1989-1990. These posts appear here in a more chronological order than when they were originally published. There is also some additional information included as well.
It is my hope if you are interested in the Wheelhouse, this page may make it easier for you to gather the information you were looking for without jumping all over the dovetails site.
Construction:
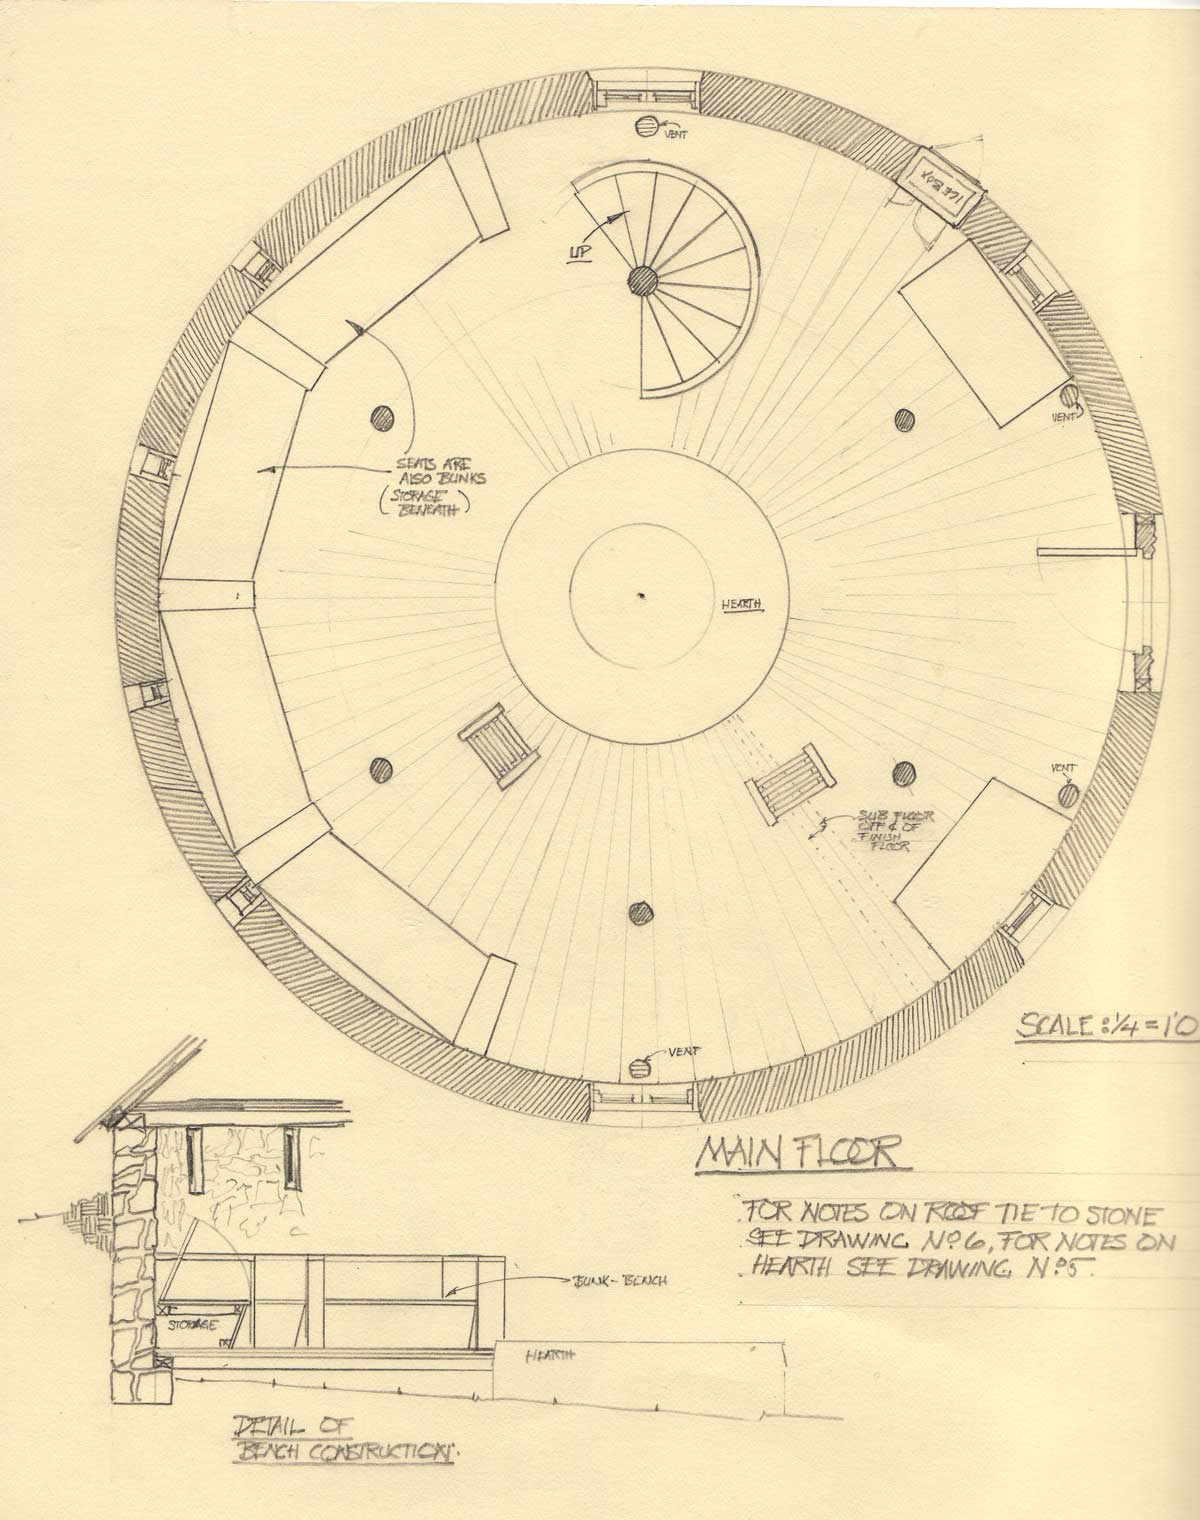
Several readers have asked for more information of the construction of the Celtic Wheelhouse. The construction drawings that I have from this project are too big to scan in one go, but I have scanned some of them in sections and am including them in this post. Even though some of the drawings have the scale indicated on them, I would not try to measure off the drawings but would recommend that you only use them to get a sense of proportion and scale. The basic dimensions are; outside diameter of the building is thirty feet across, interior dimension is twenty-eight feet across. Height of the stonewall from floor to the top plate where the roof connects is six feet. Foundation is two feet thick and goes down to bedrock, a depth that varies from two feet to four feet below the floor.

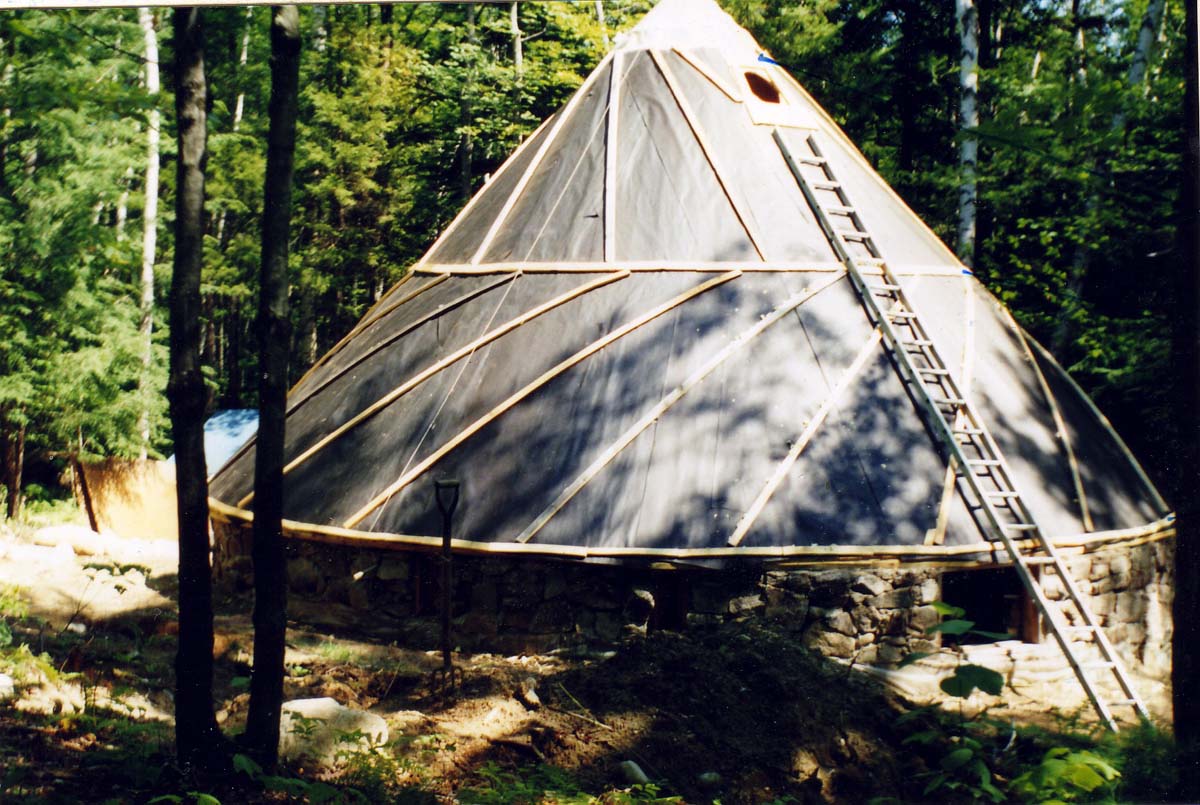
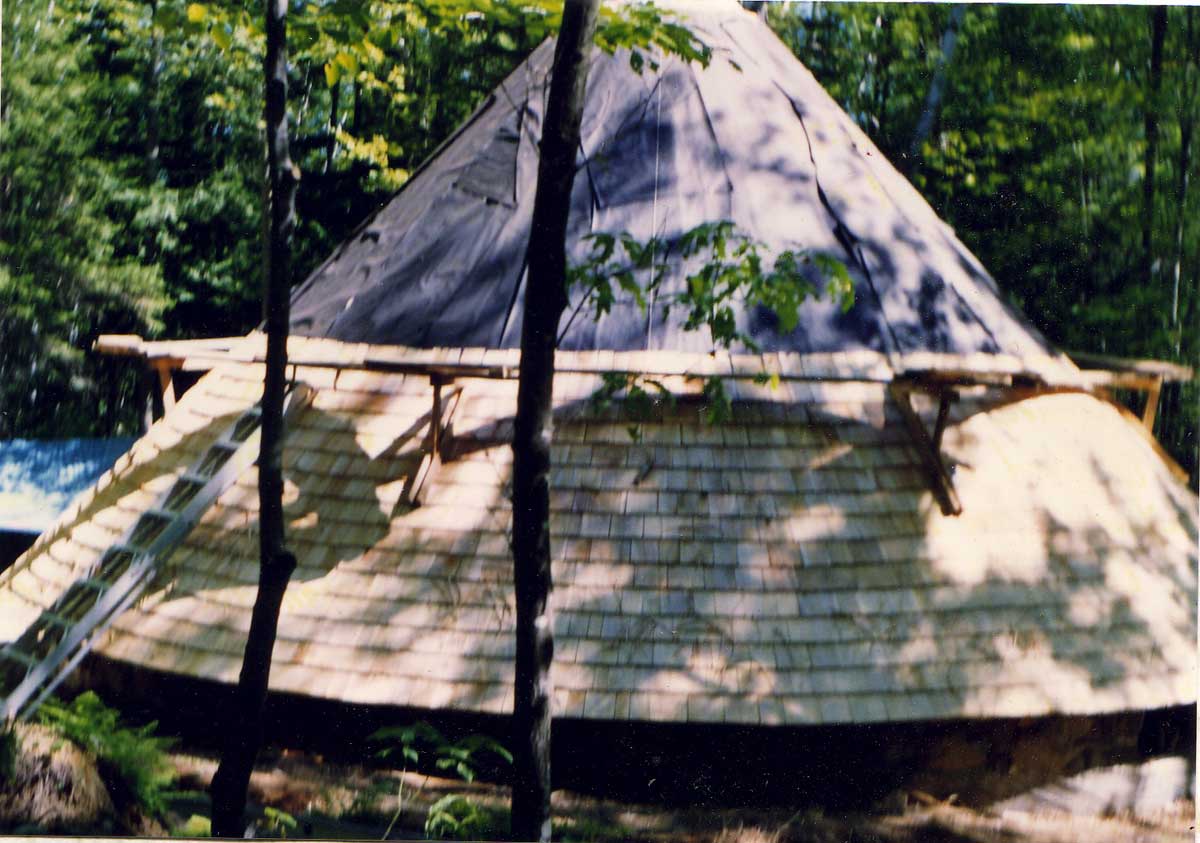
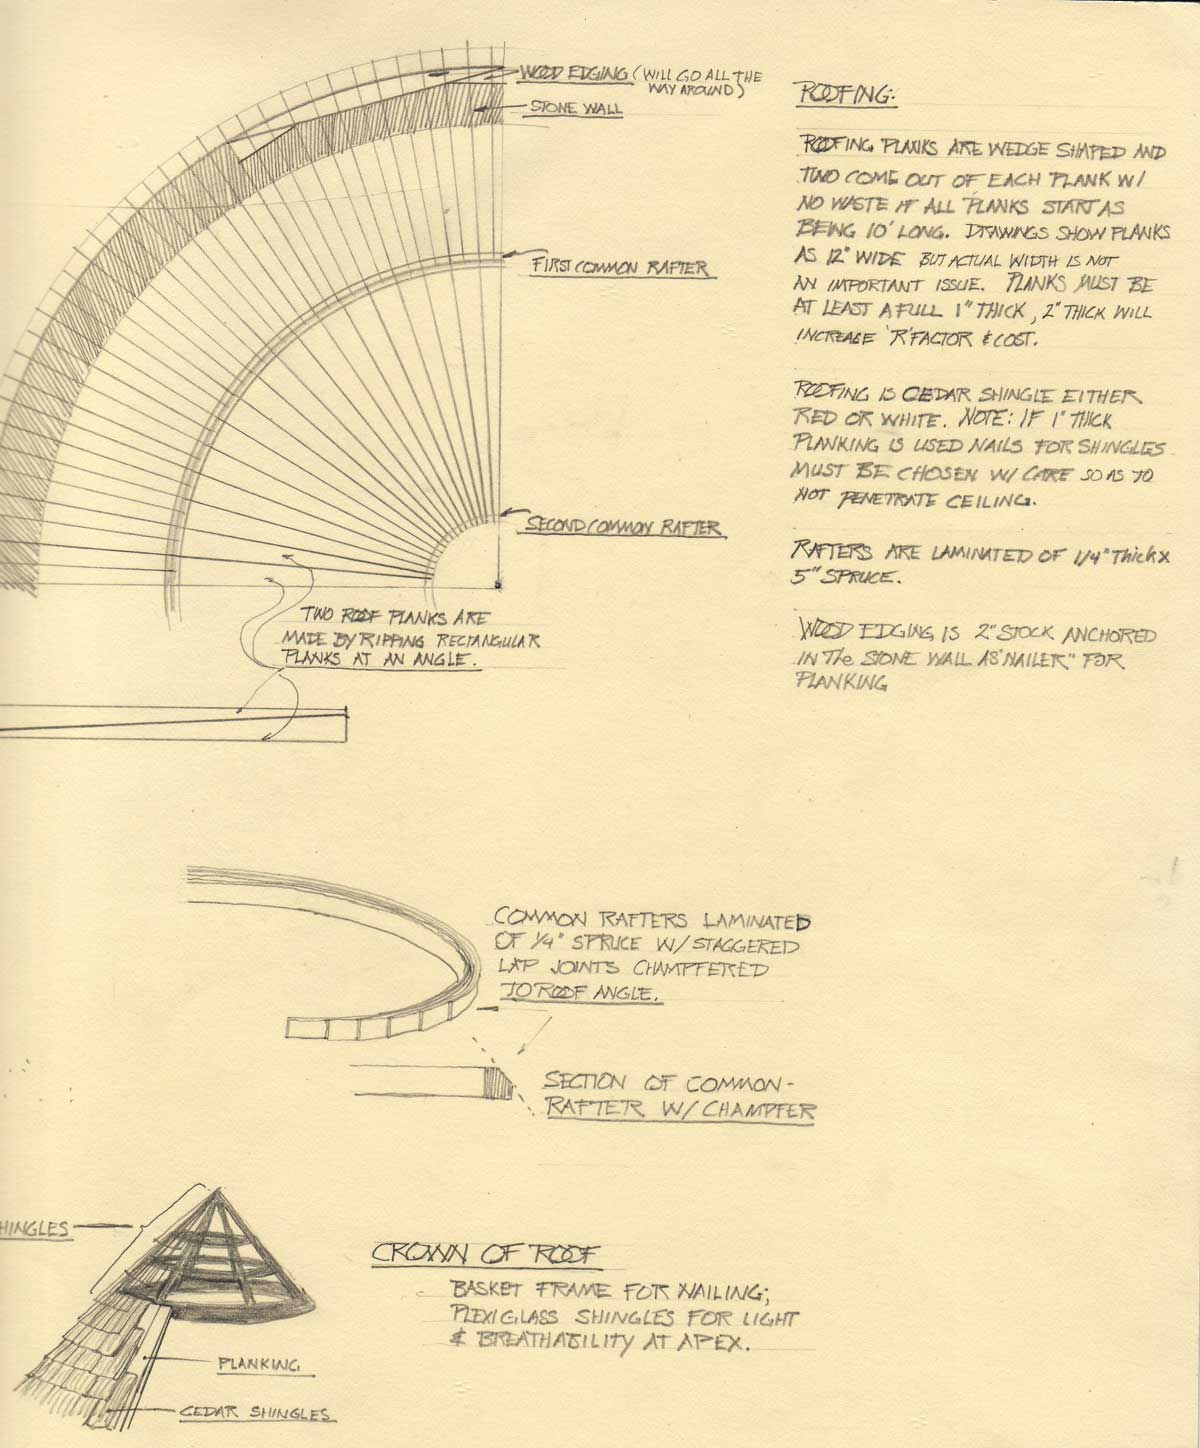
Some of the drawings show stairs and a loft, which I opted not to build. The roof consists of a ceiling made of tapered boards, a layer of diagonal compression bands (see photo below) and an outer roof. The three layers, inner ceiling, compression bands, and outer roof, combine to make a tensile roof. The roof was then shingled in cedar.
I will be posting some more related construction material as I get a chance, and late in the summer I will be re-shingling the roof because, gasp, it has been just about twenty years since I built this. When that happens there will be further posts, I am sure.
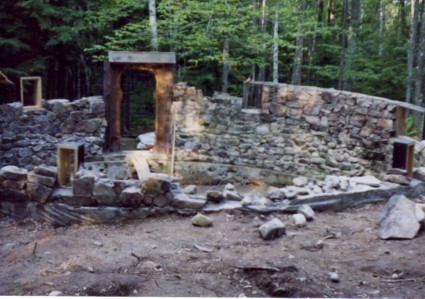
Building the “Round House” was mostly an exercise in manual labor. Digging down to ledge, mostly with pick and shovel, moving rock, and mixing mortar by hand accurately describes a good two thirds of the process. While the work was slow, it allowed ample time to think through each step of construction, and it was steady. I was continually reminded of the old axiom; “Slow is smooth, and smooth is fast”.
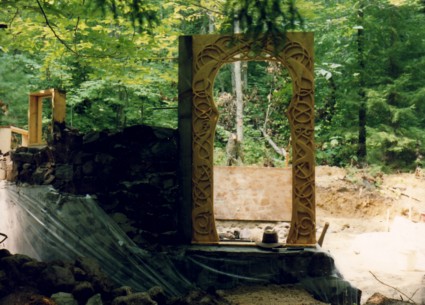
I had built the windows, carved door, and icebox ahead of time so that they could be set in place as the stonework progressed.
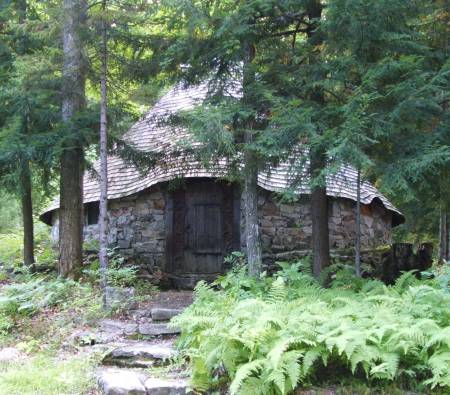
Instead of the thatch roof that would have been typical of a true wheelhouse, I had opted to use cedar shingles over a conical wooden roof. For the apex of the roof, instead of solid wood I had made a timber frame cone. The courses of cedar shingles stopped at the conical framework and I continued the shingling with wedge shaped pieces of plexi-glass. From the out side the plexi-glass is not obvious.


Upon entering the building, however, there is an unexpected amount of natural light from directly overhead. The effect is reminiscent of the kiva we visited where the main light source was the hole in the roof though which a ladder projected, and which served as the doorway.

Although the architectural elements of the “Round House” are more recognizable as Northern European in origin rather than Pre-Historic American; the overall feeling of the building is quite similar to that of the kiva. The scale of the two structures is nearly identical, and since the Round House sits dug into a hillside, it has similar subterranean quality.
While there is a seeming harmony of style to the Round House, it is, in fact, an exercise in architectural plagiarism. The door design and shingle style roof were inspired by early Scandinavian architecture. The actual carvings are more Hiberno-Saxon, the hearth was inspired by a Myceneaen-Greek hearth I had seen, although the tile design was pure Celtic. I don’t suppose it is really any more eclectic than any other house in North America, just the sources of inspiration may be a little different.
How the Project Got Started
I just returned from a trip to the desert South West. While visiting family and friends I took some time to return to the ruins at Bandelier National Monument, and Tsankawi. It was on a particularly beautiful day, hot for November, and it reminded me of another visit to the same sites many years ago.
I remember being with two close friends in a restored kiva, on that long ago visit to Bandelier. After climbing down the ladder into this round subterranean structure, we sat listening to the stillness. I remember how impressed we were by the scale and the harmony in the proportions of the structure. There was also something primordial about being in a round stone building. We wondered aloud if one could achieve the same feeling in some sort of building that could withstand the variable climate of New England, where we live. That was when I remembered seeing reconstructions of Celtic wheelhouses.
Round, built of stone, with conical thatch roofs, these structures dominated the domestic life of pre-Roman Europeans. What would it be like to build such a structure, literally one wall and a roof? Would sitting around some sort of central hearth in such a structure evoke the same sense of tranquility and contemplation we had found in the kiva? The chance to find answers to these questions came sooner than I thought.
Not long after that trip to the kiva, those same friends offered me an opportunity to build a weekend retreat and meeting place on a piece of land in the White Mountains. I did not have very much money to put towards the project, however, the refuse of a long abandoned granite quarry lay nearby the building site. The current owner of the abandoned quarry had graciously invited me to carry off all the rubble I wanted. So I had access to all the stone I could want, free; I just had to move it. I also found a local mill that could provide me with an inexpensive source of lumber for some sort of roof. With these newly discovered, and affordable, resources at hand, I spent the following winter months planning a building campaign that would require little money, a lot of sweat, and take the better part of two summers.
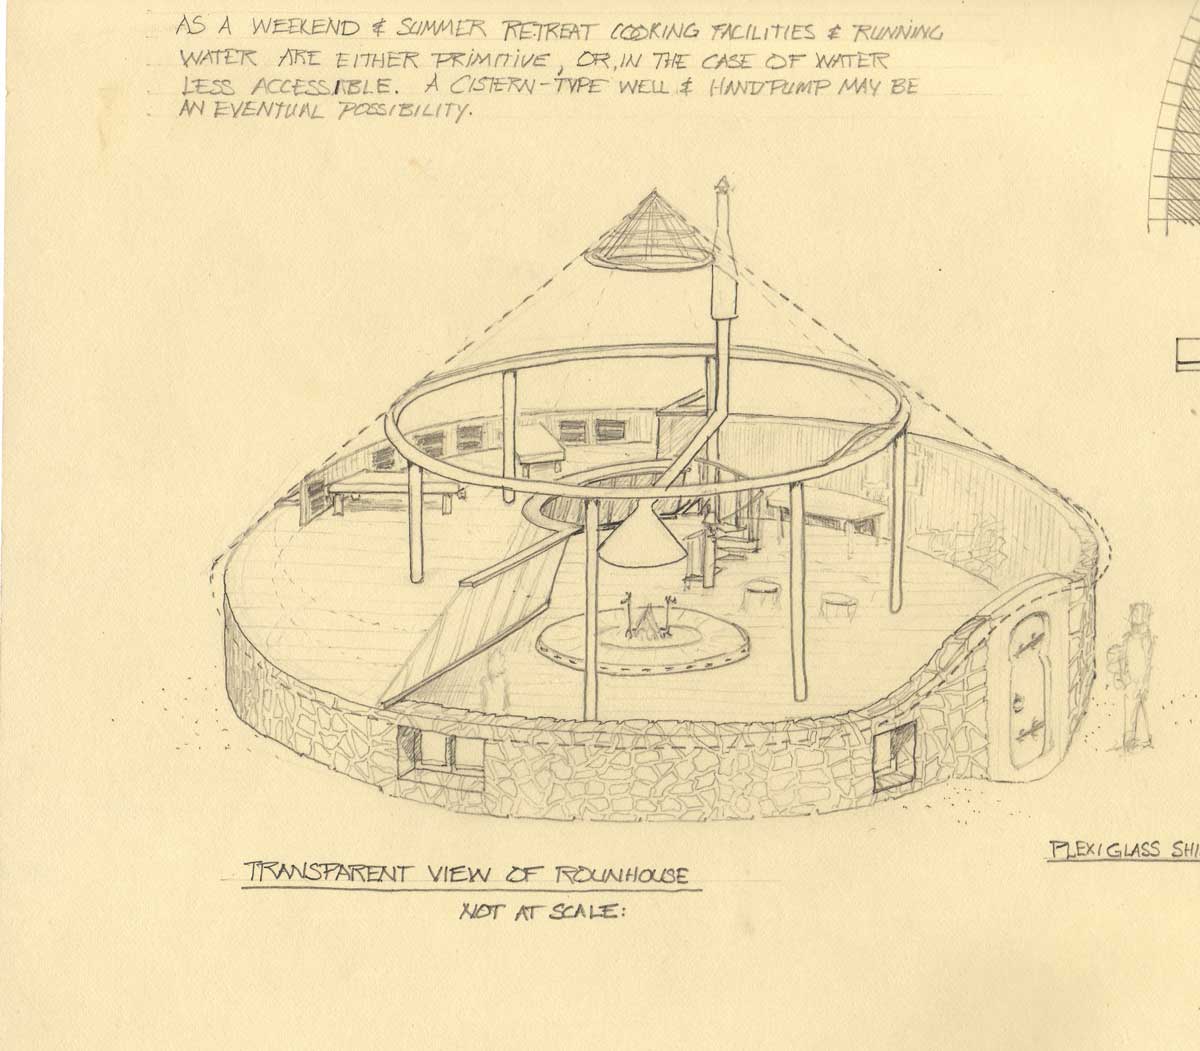
The original concept drawing for the wheelhouse
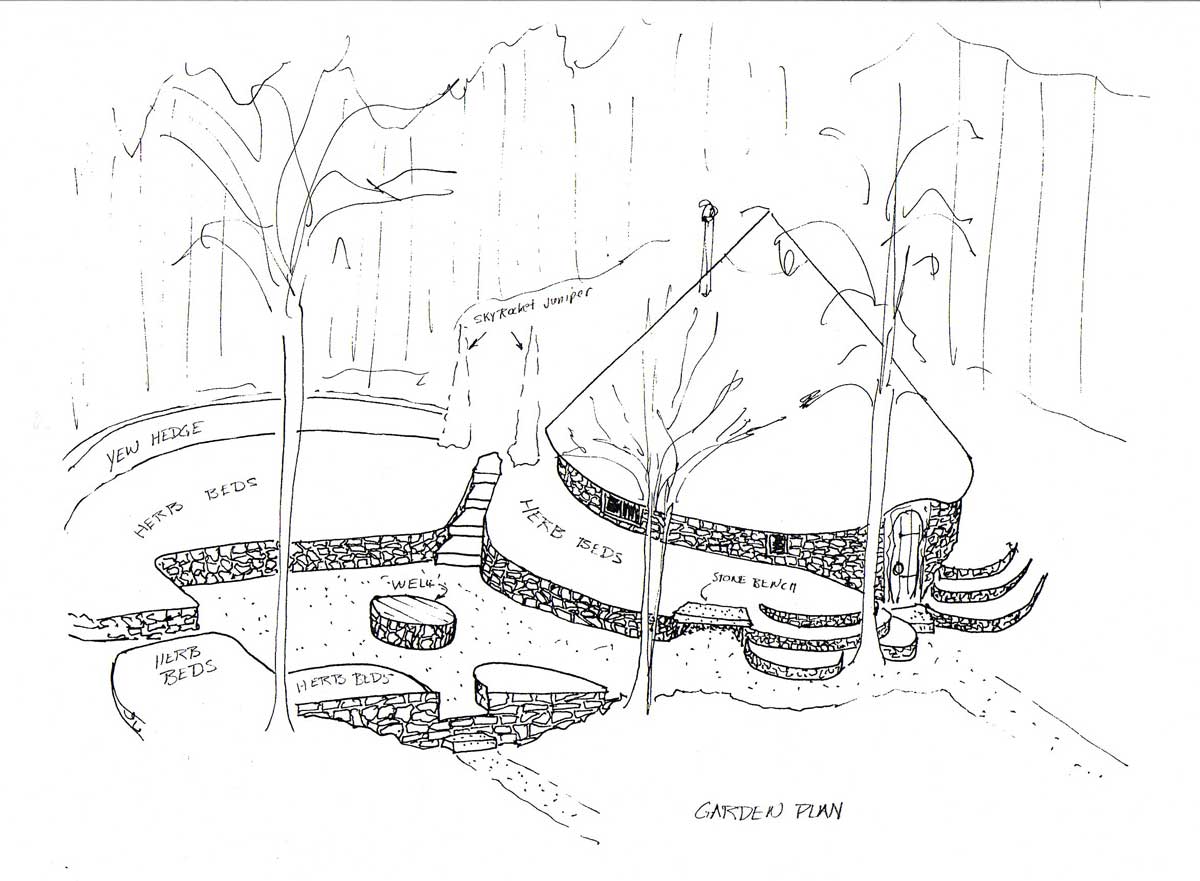
Landscape:
Quite a lot of thought went into the landscape design outside the Wheelhouse. The building is in the forest, away from roads and modern conveniences like running water. I used stone left over from the building to put up small retaining walls and to create terraces for plants. The plan was then to gather all kinds of plants, but herbs in particular that have a tradition of medicinal use. The reason for this was that I wanted there to be a theme to the garden, and I wanted to have a cross section of plants that require little attention. Basically, those plants that did well in a forest climate in New England have thrived and the rest have taken themselves out of the mix. You can see from the garden plan below the original landscape layout at the wheelhouse.
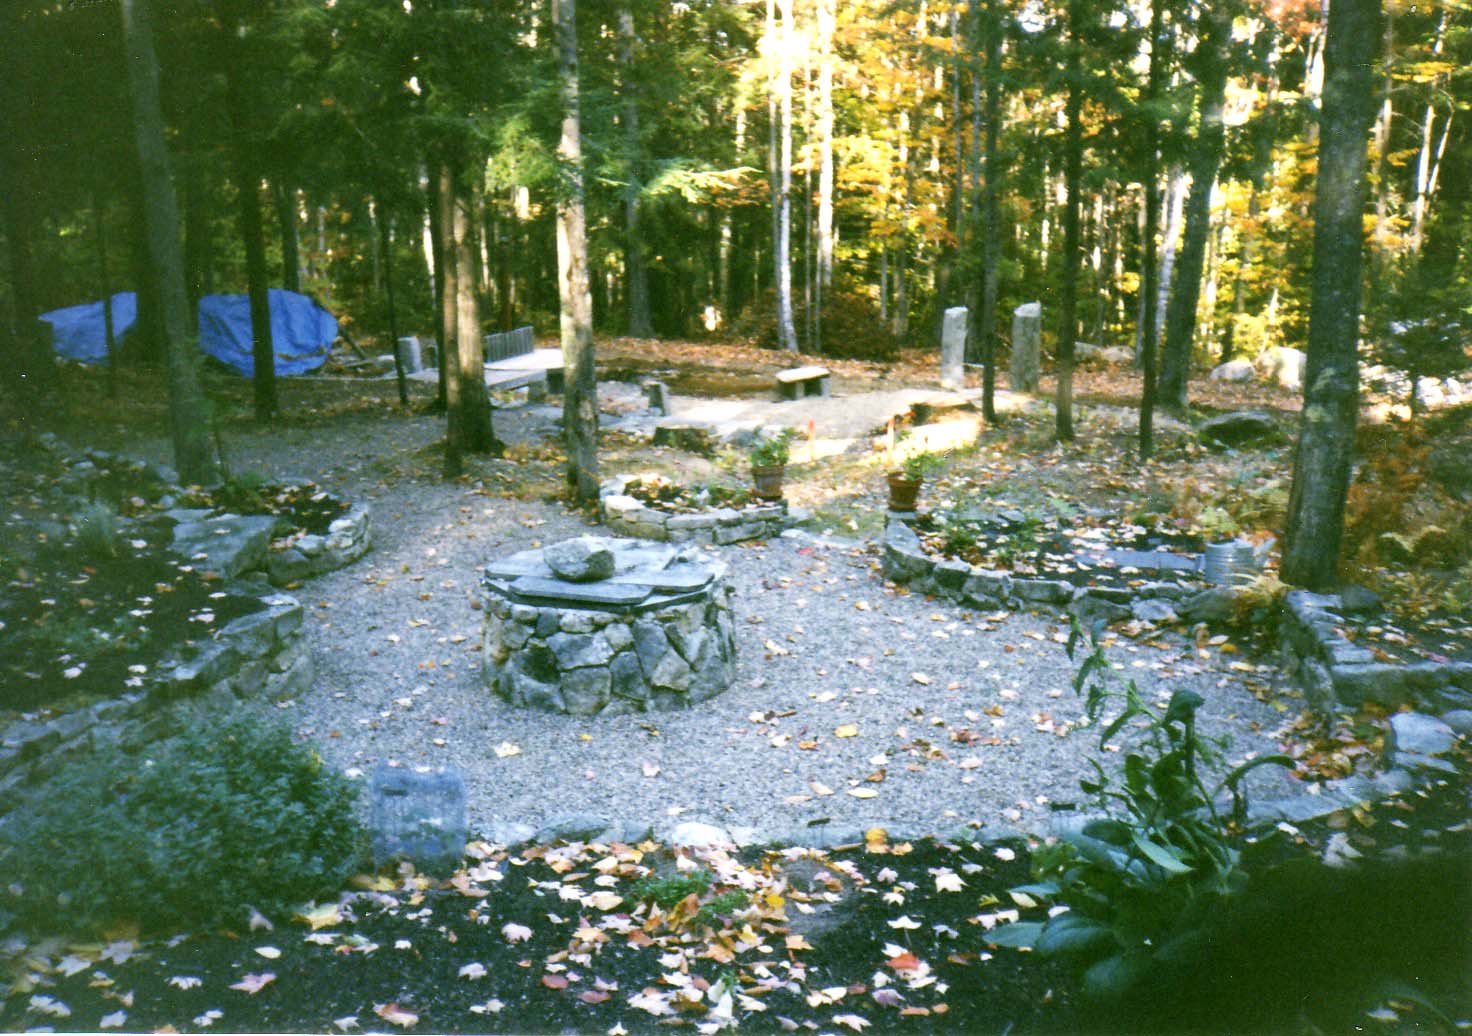
Two other elements of the landscaping that are important to the maintenance of the gardens are the well and the tool shed. The soil at the site, such as it is, varies in depth from two feet to about six feet deep and covers a granite ledge. I had excavated the soil where the building was to be built so that it sits directly on ledge. To the south of the building, the ledge forms a depression under the soil. In that spot, I dug down about through six feet of soil to the ledge and put a dry well so that water from the surrounding area would drain and collect in the well. The well is the physical center of the gardens and its location is intended to make the watering of plants as easy as possible with a bucket. Lest anyone get the wrong idea, you should know that my approach to gardening is one of minimal effort, and I water plants rarely, but the idea behind the well is sound, and when I do actually get around to watering, it is easy.
The design of the tool shed was dictated by events in the forest. Blight came through and killed a small stand of fir trees. One year they appeared to be fine, and by next summer, they were dead. The firs needed to be cut down or become a fire hazard, so I decided to use the tree trunks to make the tool shed. The shed is a cross between a log cabin and an “A” frame. It has just enough room for garden tools, some firewood, an axe and splitting maul and not much else. Even though the construction of the tool shed is different from the wheelhouse the addition of Nordic “house dragons” on the eves of the roof help, tie it stylistically to the wheelhouse.

Over the years, the gardens have taken on a life and character of their own. No matter how I try to impose order, plants have a mind of their own, after the third time I tried to put the soapwort, or the comfrey back where I thought it should be, I gave up and let them sort out for themselves who grows where. It now has a somewhat wild look but many of the plants are still doing quite well without interference from me.
The tool shed, as all tool sheds do, has collected an assortment of items that have nothing whatsoever to do with either the gardens or the wheelhouse. Homemade bows and arrows have ended up there, leftover playthings of local children, now all grown up. Half-filled bags of some miracle garden product that proved to be, less than miraculous, clutter the corners of the shed. Squirrels store odd and ends from their own lives there as well through the winters. In short, the tool shed seems to have a destiny, like the garden, over which I have no control.
I just wanted to add two further notes to the last post about the landscape design at the wheelhouse.
The first one is a further note on the construction of the woodshed. There are many ways to build a log cabin, but I chose a kind of joinery that I had seen used in the Alps and that is not very common on this side of the Atlantic, so I thought it might merit comment.
The logs are trued; that is the top and bottom surfaces are made flat and parallel to one another. Logs are also matched, in other words two logs of the lame length are matched to one another based on having the same thickness, or distance between the trued surfaces. The next step was to shape each end of the log so that it has six sides. The drawing below came from the journal that I kept while building the wheelhouse.
The reason for the six-sided ends is that the notches that hold the structure together can now be made as a simple three sided notch, rather than having to be scribed, and cut to the exact natural profile of each individual log.
The other footnote is that while completing the wheelhouse I discovered a company that made wood fired, cedar hot tub. The tub is a kit I bought from the Snorkel Stove Company. I located down hill from the well, which makes it easy to fill with a piece of garden hose set up as a siphon. It is also set into a landscaped area with stone retaining walls and gravel drainage. This makes it easier to get into the tub without tracking in dirt or mud.
The tub was great for soaking sore muscles after a hard day of moving stone, carpentry or gardening, but I don’t use it during black fly season, or in the later half of winter when it is too much work to dig it out after each snow storm.
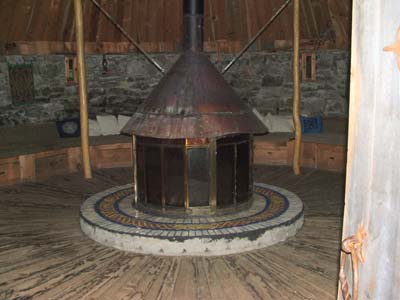
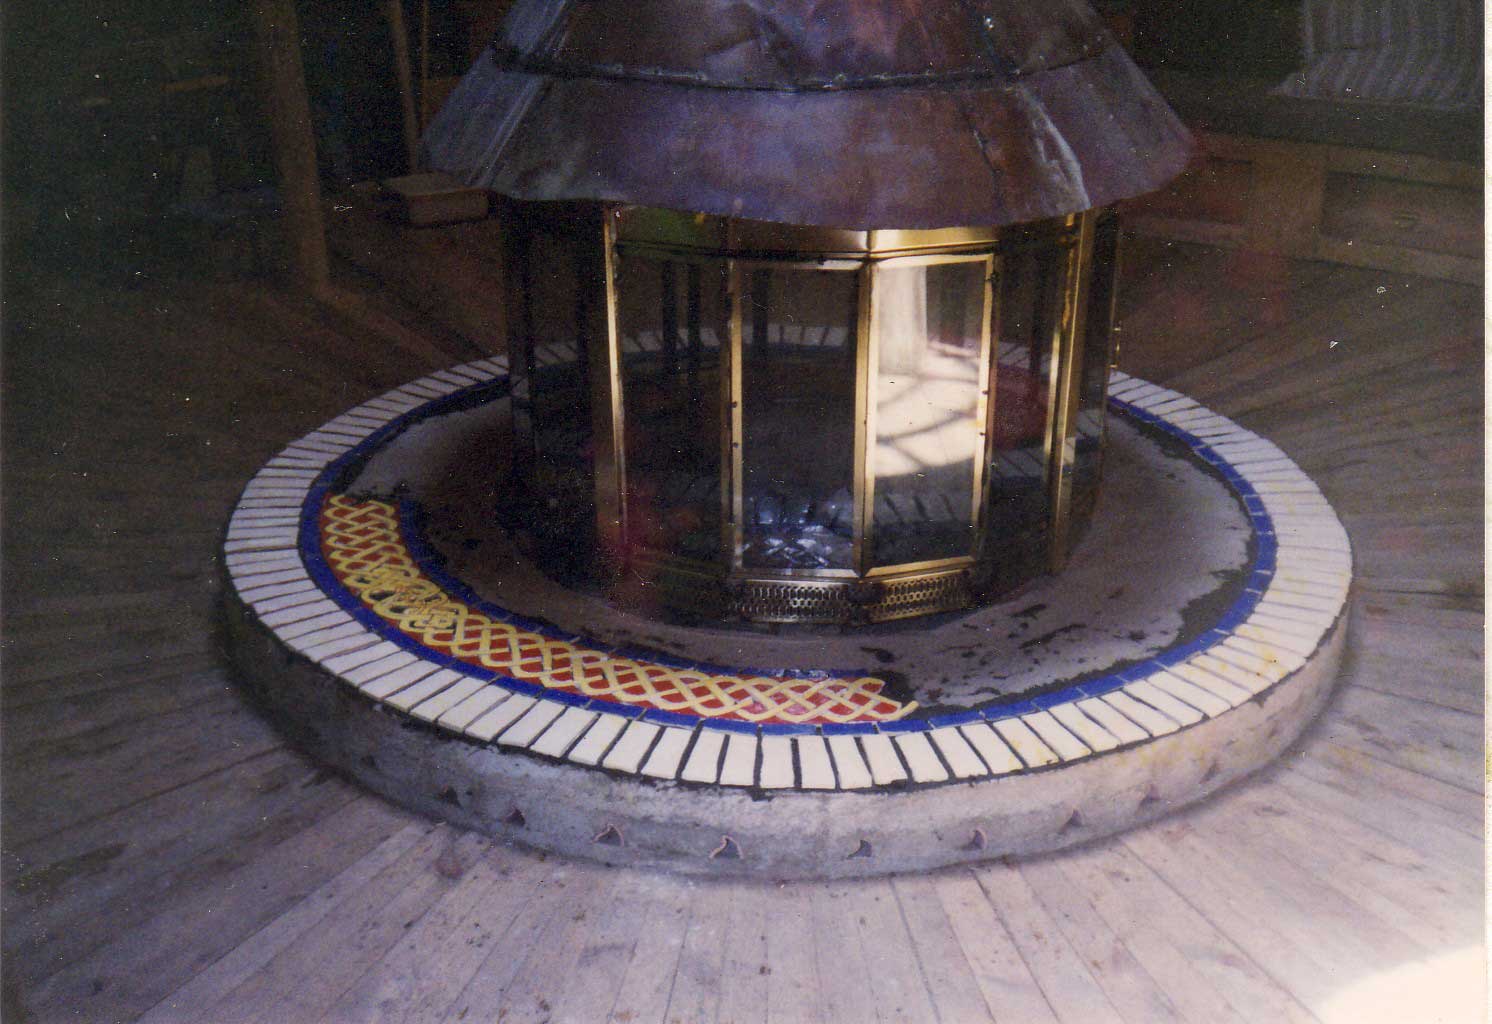
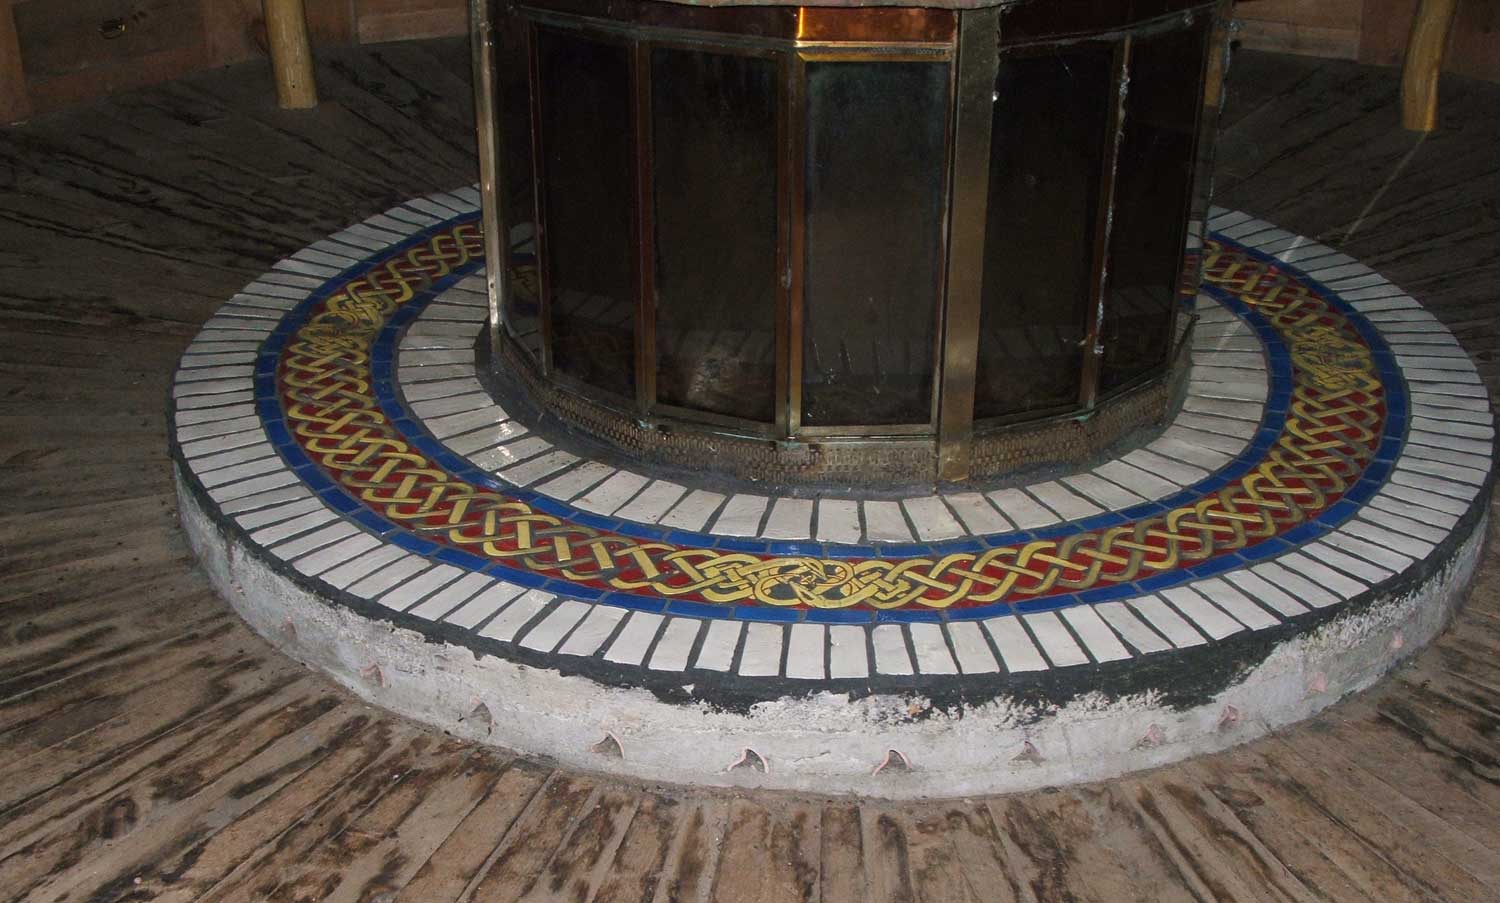
Hearth:
Last week I had an open house at the wheelhouse for the class of EMT students that was at SOLO. The tiled hearth at the center of the wheelhouse drew a lot of attention, as it often does, so I thought it would make good fodder for a post.
The base of the hearth is poured concrete and I wanted to cover the concrete with something attractive, washable, and durable.
A friend who is a potter suggested designing and making tiles for the round hearth. I came up with several designs but the only one I really liked involved making more than six hundred tiles. At first, this was too much to contemplate. What I eventually did was break down the pattern into twelve tile shapes. I made a pattern for each tile shape and assigned each a number. I made a poster-board showing how many tiles of each pattern needed to be made (with a few extra to account for breakage), got the clay all prepared, set up a production area in the shop that I was using at the time, and invited a bunch of friends over for a tile making party.
The party was a much greater success than I expected. We actually made all the tiles in one afternoon. The tiles are made of stoneware. The prepared blocks of clay were set up to cut tile slabs with a wire ¼ inch thick.
The process went like this; the slab of what will become tile is cut and placed with what will be the top side down. The back of the tile is scored lightly with a toothed trowel to take the tile mortar. Patterns are now laid out on the back of the slab in whatever way leaves the least waste. We cut around the patterns, removed the waste clay to be re-wedged and made again into clay blocks for cutting into slabs. The next step is very important, many of the tiles look quite similar but are not interchangeable, so each tile was stamped on the back with the appropriate pattern number, and this eliminated a lot of confusion later on. The very last step was to carefully remove the green clay tile from the work surface, touch up any imperfections by hand and lay the tiles face up on sheets of drywall to dry.
My potter friend then lent me one of her electric kilns (she did, and still does collect pottery stuff to an alarming degree) I set up the kiln in the garage where I lived and was able to do all the bisque firing in one go. I had to do the glaze firings in several different firings, first because some of the colors I chose needed to be glaze-fired at different temperatures from one another, and second because not all the glazed tiles would fit in one firing without touching one other and thus sticking together.
At last all the tiles were bisque fired, glazed and glaze-fired, boxed by pattern type, and the boxes numbered and labeled.
I now thought that the worst was over, it came as something of a surprise therefore when I discovered that the actual process of tiling would take several days and many hands helping in order to complete this project. In fact, it took several months to find a window of opportunity to set the tiles, but the finished hearth met all of my expectations.
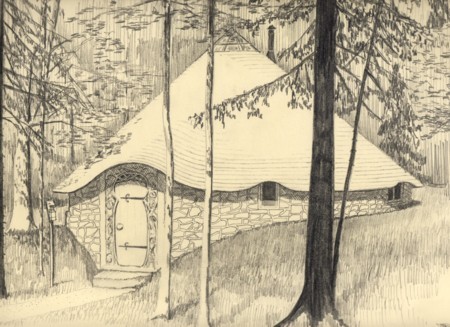
The Wheelhouse in Winter:
One of the delights of the wheelhouse is the metamorphosis that occurs when we get snow. Snow has the ability to transform almost any landscape, but when I built the wheelhouse, I did not appreciate the magnitude of that transformation. The first time I went out to the wheelhouse after a large winter storm, I was surprised and enchanted by the transformation.
A building with a steep conical roof, set into a hillside, buries itself in snow. The combination of the snow sloughing off the roof while the building has already been built into the ground gives the illusion that there is more snow here than in the surrounding woods. Entering the building has the quality of entering this subterranean chamber that hasn’t been opened in centuries.

Of course, digging out of the snow has a different quality to it, and I am grateful that this is a retreat and not my main residence, but I do not want to sound like I am complaining. A world where nature does not have the last say would, I think, be a world diminished.
I appreciate most that, after I had put so much thought into the size, and placement of the building, the proportions, the relationships of window and door to wall, the volume of space to human scale, nature can trump my design and magic can fall out of the sky.


November 26, 2008 at 9:16 am |
Ted,
Good fun to read through the text, see the phottos and recall the fun times I had there with you and Frank. Now working on the other side of the pond teaching a new crop of PAs.
Patti and I now have a place on the east coast of Nova Scotia, south of Liverpool, next penisula from the Seaside Adjunct National Park with 13 acres on the ocean so easy access for your boat. There we have a 20′ yurt in addition to our 8ft ‘bath yurt’. You would be most welcome to use anytime. We can tell you where we keep the single malt!!
Cheers,
D-
December 1, 2008 at 10:01 am |
DK,
So great to hear from you! I am so glad you found the site, I will follow up with an email. Thanks for the comment,
T
January 4, 2009 at 11:34 pm |
Ted:
I came across this site while looking at yurts. I also have an appreciation for stone houses and log homes.
This house looks magical. I love that you mention the overall site planning process and how it informed the rest of the building process.
Can you go into detail about how you did the stone work? Did you shape the stone for use or puzzle it together? Were there any slipforms? Did you use a mortar? Has it settled any since you finished it?
I especially love the door.
Thanks for sharing your great work.
Rob
January 5, 2009 at 2:03 pm |
Hey Rob,
Thanks for the interest. The stone is all local granite, which is scattered through the woods hereabouts. There was a sort of quarry a coupe of hundred yards away so I did not have to cut much stone. I did break up large flat pieces with a sledge, and in a couple of instances used a stone drill, shims, and feathers to cut large blocks.
The foundation of the building sits on a granite ledge, digging down to the ledge by hand was one of the worst parts of the job. Since the building sits directly on ledge, there has been no shifting or settling.
The stonework is mortared with a mix of, if I remember correctly, one part masonry cement, one part Portland cement, and six parts sand. The resulting mortar is very sticky and means you can minimize the amount of cleaning for each piece of stone before mortaring. Hope that answers some of your questions.
Thanks again for checking out “dovetails”.
January 15, 2009 at 6:18 pm |
HEY M.W! SO GREAT TO SPEAK WITH YOU THIS EVENING. I AM THRILLED TO HEAR THAT YOU ARE SO WELL. MY CHILDREN ARE POURING OVER YOUR WEBSITE. THEY HAVE MANY QUESTIONS. THEY WANT TO KNOW IF YOUR DOG IS A FULL WOLF OR HALF. SECONDLY, THEY WANT TO KNOW IF YOU BUILT THE WHEEL HOUSE BY YOURSELF. MORE QUESTIONS TO FOLLOW – LINDSAY
April 1, 2009 at 6:24 am |
I am in love with the work you do, you are an inspiration. I am an aspiring artist/woodworker living in York county Maine, I mostly carve small sculptures, signs and I am a reduction woodcut printmaker. I found your blog randomly after taking Peter’s treehouse book out of the library, fairly serendipitous. I think one of my favorite parts of your blog is the part about your apprenticeship. I wish more people would take chances on other people like that, I know I would thrive in a situation like that. Unfortunately I think you have to find that when you are young and free of life’s attachments like mortgages and two year olds. My two year old is my absolute reason to breathe and because of that I have been a stay at home dad since she was born. Now that she is starting to go to daycare though I am starting to look for new opportunities to grow my art and contribute to my family’s finances. At 35 years old I wonder how I would do in an apprenticeship, I also wonder if I would have the patience to take home such a small paycheck knowing how hard I worked. Like I said that is the benefit of being unattached, in my 20’s if I had $20 to live on I would make that last but now….. Well thank you for your inspiration, I am thouroughly jealous of your abilities and maybe someday I will be able to see your work in person so I can drool directly on your talent.
April 1, 2009 at 8:25 am |
Thank you for the kind compliments Shane.
I do feel fortunate to have apprenticed when I was young. On the other hand, one of the advantages of working with a master craftsman who is also a master teacher is that you are constantly reminded of how little you know and how much there is left to learn. It never really ends. And I think that is one of the most challenging and rewarding things about a life centered around creativity.
I am glad you found Peter’s book and hope you enjoyed it.
Thanks again for the kind words.
February 18, 2010 at 10:32 pm |
thanks for your site,looks like you’ve got a lot of talent.;but it’s your brains i need.i would like to build a stone house ,but built with a clay oven,serveral ovens as a matter of fact,plus a small wood fired kiln’;have you ever heard of anyone who has built more than just a simple clay oven? appreciate any help,will airmail your first loaf of bread free!!
March 2, 2010 at 7:56 am |
Thanks for your kind words about “dovetails”. The only resource that I know of for wood fired ovens and the like is a fellow I met some fifteen years ago named Albi Barden. At that time he was building Finish fireplaces and heaters and was incorporating ovens. I just did a search and his website might be of some interest. mainewoodheat.com
I hope this helps…
September 12, 2011 at 6:47 pm |
I am in love with the work you do, you are an inspiration. I am an aspiring artist/woodworker living in York county Maine, I mostly carve small sculptures, signs and I am a reduction woodcut printmaker. I found your blog randomly after taking Peter’s treehouse book out of the library, fairly serendipitous. I think one of my favorite parts of your blog is the part about your apprenticeship. I wish more people would take chances on other people like that, I know I would thrive in a situation like that. Unfortunately I think you have to find that when you are young and free of life’s attachments like mortgages and two year olds. My two year old is my absolute reason to breathe and because of that I have been a stay at home dad since she was born. Now that she is starting to go to daycare though I am starting to look for new opportunities to grow my art and contribute to my family’s finances. At 35 years old I wonder how I would do in an apprenticeship, I also wonder if I would have the patience to take home such a small paycheck knowing how hard I worked. Like I said that is the benefit of being unattached, in my 20′s if I had $20 to live on I would make that last but now….. Well thank you for your inspiration, I am thouroughly jealous of your abilities and maybe someday I will be able to see your work in person so I can drool directly on your talent.
+1
December 28, 2011 at 1:42 pm |
Ted,
I was an ALEC student in 1995, and I remember vividly the brief time I spent in the wheelhouse. It’s wonderful to find it here and know that you’ve been busy all these years creating enduring art… You work inspires me to build and create.
Sean M.
February 9, 2012 at 9:07 pm |
I opened Lloyd’s blog site and when I saw this picture said, “ooooooooooooooh” and went right to your discription. oh soooooo lovely. For 17 years in Hawaii, I wanted a rock round house as termites don’t like rock or cement. I was inspired by Lloyd Kahn’s Shelter book 30 years ago. then when we were 67, we moved to Nauvoo, Illinois. yes, finally built a round log house from logs that were in a house in Pennsylvania in 1750. you can see it at http://www.irenetukuafu.blogspot.com
I do love your rock round house….and find that we all may have “genetic memories” if we listen in the forest…………..Thank you for your work of long ago and be careful on putting new shingles on it again…..wear ropes. oh happy day, Irene