The Toy Page
This page is more of a photo-blog with captions. It features more pictures of some of the toys mentioned in the posts as well as some other toys that do not need much explanation.
You can read more about making toys by clicking the “Wooden toy” category in the right hand column.
Aircraft:
The Spirit of St Louis was made for a nephew who saw the original in the Smithsonian. Note: You can just make out “Charles Limbear” in the second photo with door open.


Here are a couple more shots of the Tomcat. There is a push rod in the back that swings the wings either out or to the swept back position.


Another well loved toy is the Saturn 5 which several kids can play with at once.

The Saturn5 with all the different parts.

On a totally different theme; my nephews and niece were reading a wonderfully illustrated book on the Trojan war….so….


Here is the Trojan Horse with the gates of Troy. The horse, the gates, and the war chariots were all separate gifts. You can see one of the war chariots a little better in the next photo.

Greek ships…


Along the same lines, is this Minoan Palace…

The palace is in the same scale at the Trojan pieces so they can all be played with together.

Another set of toys that are constantly being played with, are navy ships.I apologize for the poor quality of the photos (I can’t even find photos of the mine sweepers).

The carrier has a crank elevator that moves planes from the flight deck to the hanger deck.


Along with the ships are the boats that were already mentioned in the posts. The catboat has a steel centerboard that folds up so that the toy can be played with on the floor. When placed in water the centerboard drops down by itself.

The other thing about the catboat is that it is the kind of toy that can be easily produced in quantity. I think I have made about half a dozen of these at this point.

Here is another picture of the ‘Bearable”.

Trucks are always popular.

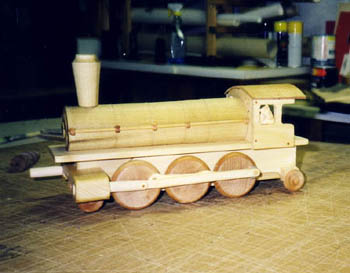
The steam engine again.

When my niece was quite small, she wanted a dollhouse but was not old enough yet to inherit the elegant, and rather delicate, dollhouse that the grandfather I never knew built for my mother. I built the Mouse House as a sort of fill-in-the-gap toy, to play with until she was old enough for a real dollhouse.
The premise for the mouse house was Miss. Mouse; a three inch tall stuffed mouse, who needed a place to live. The idea was that I could make the mouse house out of an actual tree stump and make it much more rugged than a conventional dollhouse. After finding, and cutting, and drying, a stump that was the right size, and approximate shape, I set about cutting the stump in half vertically. This is when I discovered that the maple stump I had harvested was actually a rock-maple stump. When I got the stump cut in half, I began to hollow out the insides of the two halves to make the rooms of Miss. Mouse’s new home. The idea was that one-half of the stump-house would be glued to a solid base; the other would swing out on a large hinge so that the house could be opened in order to get to the rooms inside. Hollowing out the stump took some time with big gouges and chisels, but the simple and sculptural interior was just what Miss. Mouse needed. I had chosen a tree stump that had some wonderful natural clefts in it. As I hollowed out the two halves of the stump, I cut through the back of these clefts in several places to make irregular openings. By cutting these openings, I was able to make two places for small, hinged, doors. I filled other irregular openings with pieces of plexi-glass cut to fit the individual openings and glued in with epoxy to make windows.
The furnishings for the mouse house were made from matchboxes, thimbles, acorn tops, and empty thread spools. I cut small cedar shingles to glue onto the roof of the house, and painted the base.
The tree trunk that makes up the mouse house has cusped slightly over the years, but is otherwise intact, and has survived a lot of play. My niece has now inherited the dollhouse that her great-grandfather made, yet the mouse house remains a popular, and well played with, toy. In fact (this is a sensitive subject, and is not a topic for discussion with my niece and her siblings,) we are on our second Miss. Mouse, as the first one wore out.

The mouse house.

This is not a “how to” site, but I have had a number of requests for a step-by-step explanation for making a simple wooden toy. To that end, I am going to walk you through my process for making a simple wheeled toy. Before I start, let me make a couple of disclaimers: One is that I cannot stress safety enough. Whether it means wearing safety glasses and a dust mask, or simply being careful near any kind of tool with a blade—toy making is not fun if you get hurt. Second, I do not usually work from measured drawings. I know that frustrates some wood workers, but I sketch things out at actual size and design almost entirely by eye looking most closely at proportions.
This is a toy for my youngest nephew and is an airplane pull-toy, specifically: a F4U Corsair.
The first step I take is to sketch out the toy actual size. This allows me to think out how much wood the project will take and what the dimensions of rough stock will need to be. It is also where I start thinking through the construction process. The corsair will be very simple; fixed wings, fixed landing gear, and other than the wheels, no moving parts.

As I draw out the dimensions, I have decided that I will turn the body of the aircraft on the lathe. I will make the wings and landing gear as one unit, and I will make the tail and cockpit as a third unit.
The toy will be varnished wood, with a clear canopy over the cockpit, and a bear as the pilot. If you don’t know why a bear is flying a Corsair you need to read “the whole bear thing”.
The cockpit canopy and the propeller are the only non-wooden parts. Both will be made of clear acrylic.
The rest of this post will concentrate on the body of the aircraft.
The body is made up of several pieces of poplar glued together for the lathe. Once dry, the piece will go through four steps before going to the late. First I will pre drill what will be the front of the plane with a one-and-a-quarter inch diameter hole that is about a quarter-inch deep. Next I will drill an eighth-inch diameter pilot hole in the center of the inch-and-a-quarter hole. The 1/8″ hole will allow me to center the piece on the lathe more easily and will also serve as a pilot hole for a larger hole that will be drilled much later on when it is time to attach the propeller. The next two steps involve making cuts that will allow for easier assembly later.
While the block is still rectangular, I will cut out the notch where the wing will attach, and I will make the long cut in the upper body where the cockpit, after cockpit, and tail will attach. I want to make these cuts now because the rectangular block will present 90-degree angles to the saw making the alignment of pieces later automatic and easy. The last step before the body is put on the late is to take off the corners of the piece and make it eight sided. Thus the piece looks like this:

On the lathe, I will turn the cowling, and the basic shape of the body.

The body of the aircraft on the lathe

another shot on the lathe
There we have the first piece:

In the last post, we glued, cut and turned the body of the corsair. In this post, I will concentrate on the wings and landing gear:
The wings will be made of two pieces of polar glued together. They will go through five steps; The pieces will be glued together, they will be squared up, drilled for the landing gear, cut on the band saw, and finish-shaped.
Here is the rough “blank” of wood with the rectangular holes for the landing gear. The landing gear are in the background and are made up from commercially made wooden wheels glued and pegged to uprights.

The rough shape is cut on a band-saw.

The wings are shaped with knife, plane and sandpaper.

The landing gear is glued in.

Now you can see how the wing and body go together:
The third phase of construction on the corsair is the tail/after-cockpit section that defines the cockpit. As part of this phase, I will be making the pilot too.
If you look at the top of the body of the plane, you will see a long tapered flat spot where this last section will attach. The shape of the long tapered flat spot will determine the shape of the after-cockpit.

Cut rough and then sanded to fit, the after-cockpit has a vertical slot to help hold the tail in place.
In the aft end of the body I have cut a lap for the horizontal stabilizer.
 The tail wheel is pegged so that it can swivel.
All of these pieces are glued together:
 The pilot is shaped out of select pine and glued into the cockpit:


In the next section we will look at the acrylic and the finishing steps.
Finishing the toy: At this stage, and before I do anything else, I am going to give the toy several coats of varnish. You can use anything you like. Personally, I am more in favor of old-fashioned oil base varnish. My reasons have to do with longevity and wear. Simply put I have never had any other product hold up as well. An alternative is Tung oil, which works well too, but has a lasting odor that some children will not like.
Again, I will repeat that this is just my experience, but I have had very poor results with poly-products. I have used both water-based, and oil based poly and what I have found is that they do not bond well enough to the wood to hold up to constant play. The result is that they chip, crack and peel, and that makes me nervous because I don’t want the little ones eating chips of anything that comes off a toy.

Varnished toy
Once the varnishing is complete, painted details can be added. I paint on insignia, nose art, and any other decorations. In this case, my nephew is only two, so I am keeping it simple. However, if the child is a little older, the decoration is an area where you can personalize a toy, giving it a name, or insignia that have a special meaning to the child in question.
The last two pieces of the project are the propeller disk and the canopy, both of which will be molded from acrylic that is one-eighth of an inch thick.
The acrylic pieces can be a challenge. The propeller is just a disk of clear acrylic, drilled on the drill press and cut out on the band-saw. However, even such a simple piece must be carefully drilled and cut to avoid blistering and cracks. The cockpit canopy is made by carefully and slowly heating a piece of acrylic and shaping it over a poplar form. In some cases I will use a vacuum jig to help form the canopy, but I have to point out here that complex shapes are hard to achieve and it takes practice to get good results, so the simpler the design and the easier it is to execute, the better your chances of success. If you want to know more about shaping acrylic, or plastics, go to “you tube” and type in vacuum molding.
I glue on acrylic parts using two part marine epoxy that has been slightly thickened. The resulting paste will be stronger than either the acrylic or the wood, and it will not be as prone to run or drip.
The finished toy:

The completed toy

Just to follow up the last toy posts about the corsair, here are some pictures of a more complicated toy plane built for an eight-year-old.


Like the Corsair toy, a crew of bears flies the B-25, “Bearfoot Bomber”. Unlike the Corsair, it has quite a few moving parts, including, retractable landing gear and Bombay doors that open. However, the design and execution follows the same process described in the posts about the Corsair toy. I started with drawings done actual size, and built the body of the aircraft and the wing/engines as separate units that do not get glued together until quite near the end of the assembly process.

Drawings for the B 25
The other challenge of the B25 is that the acrylic canopies for top-turret gunner, the nose of the aircraft, and the cockpit are shapes that are more complex to mold. I ended up making several attempts at each shape before I got results that met my needs.

lots of complex plexiglass

Landing gear up!

Close up of one of the B 25 crew
Here is another wooden toy; the “Grizzly” tank. Wooden treads glued to cloth backing rotate on eight sets of wheels. The tank commander is removable. This was a Christmas gift for the same eight-year-old boy who has the B 25.


August 1, 2007 at 9:07 am |
As sellers of wooden toys, I was drooling over these amazing toys. Wow! I love the spaceship and the castle is absolutly outstanding. You have very lucky nieces and nephews. My son was also drooling alongside me looking at these wonderful toys.
August 2, 2007 at 7:57 am |
Thanks for the nice comments. I just improvised a bear on a surfboard while on a cruise with some kids, but I did not get a chance to photograph it. I will have to make another and get some pictures. Hang ten!
Cheers, Ted
July 19, 2009 at 1:01 am |
Is good to see, wooden toys are still in fever.
the airplanes are most beautiful.
Regards,
Peter